This guide aims to walk you through the process of effectively integrate Chorus Pro with Cirrus Shield.
Prerequisites
Before you can start using the service, you will need to do the following steps:
In Chorus Pro :
- Create a Chorus Pro Account
Create a chorus pro account by signing in to the chorus pro portal, here is the link: https://portail.chorus-pro.gouv.fr/aife_csm?id=aife_index - Create a Chorus Pro technical account
After successfully setting up your Chorus Pro account, it’s essential to establish a technical account if you haven’t already. This technical account will be used for making API calls on the Chorus Pro API to take advantage of its features. Follow these steps to create the technical account:
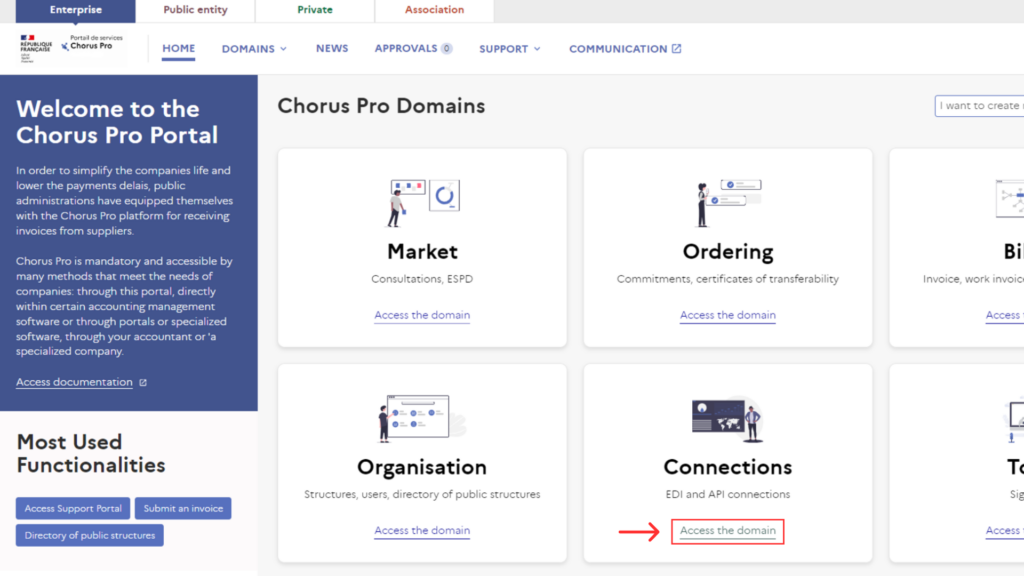
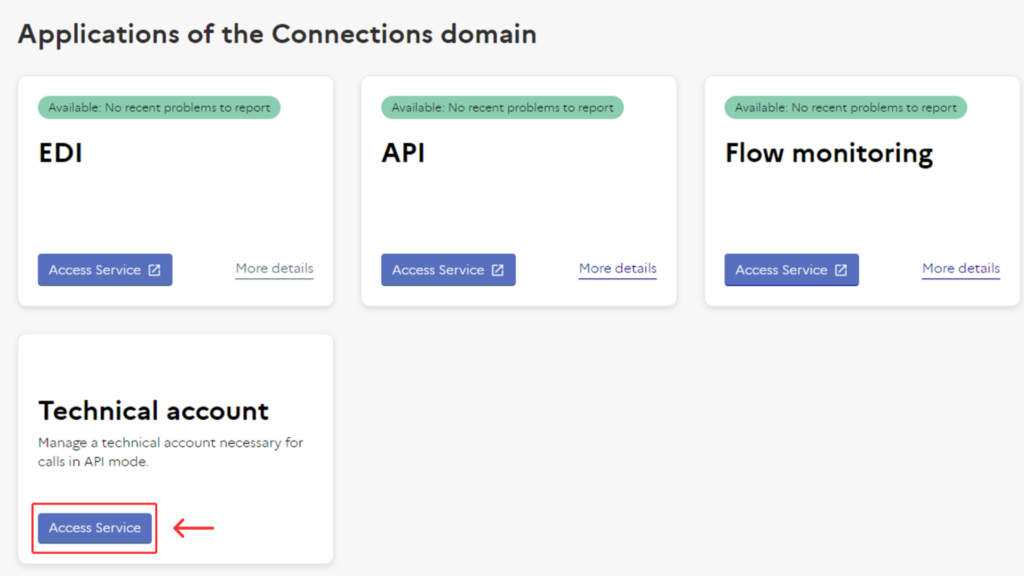
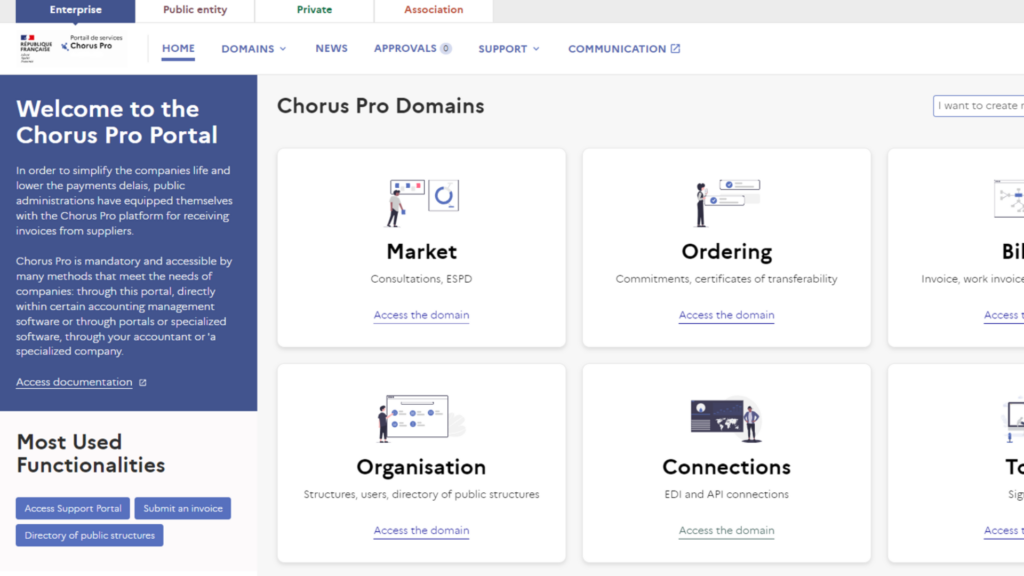
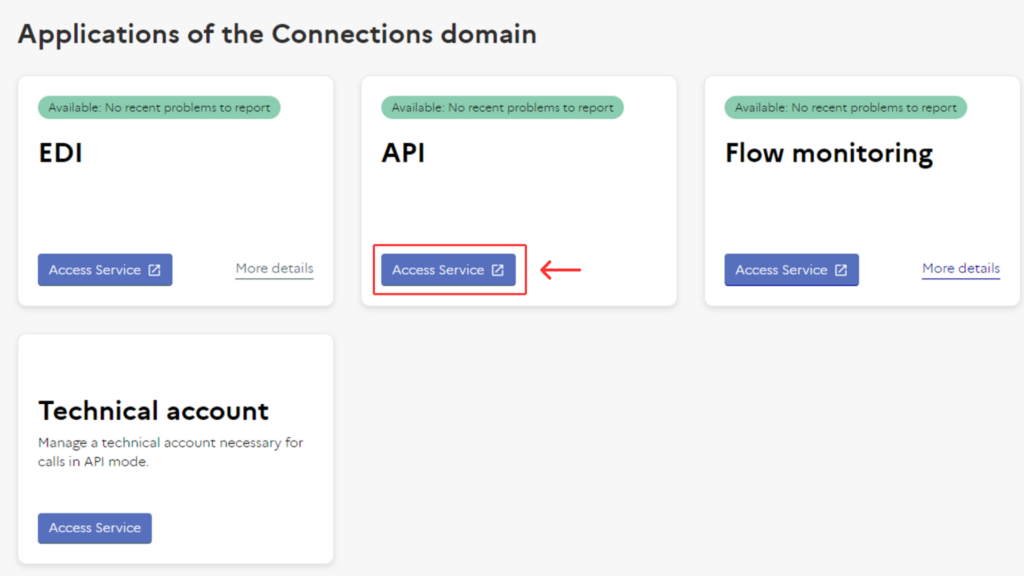
a. Navigate to the Home tab and select the “Connections” box. Click on the “Technical Account Access Service” button.
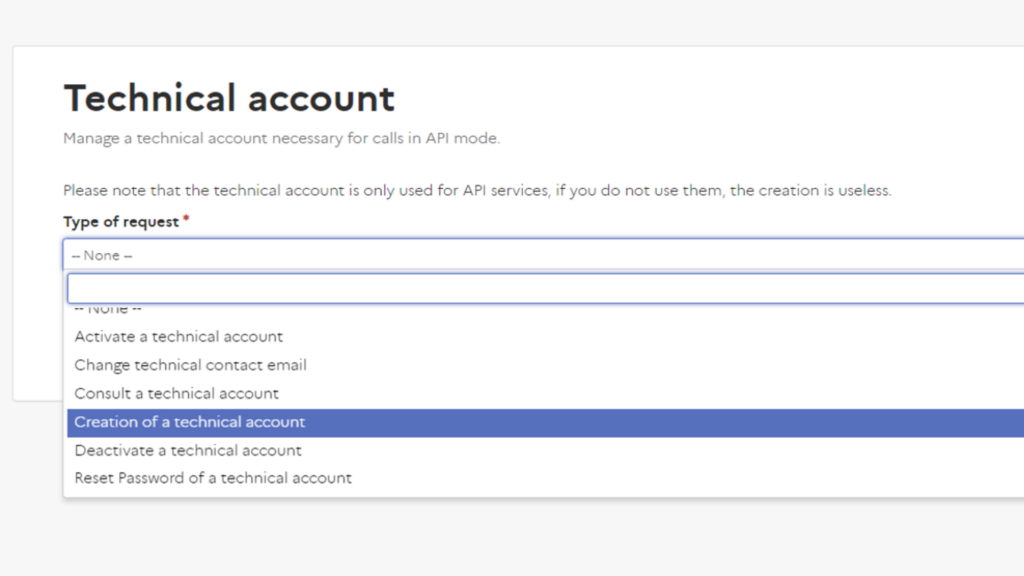
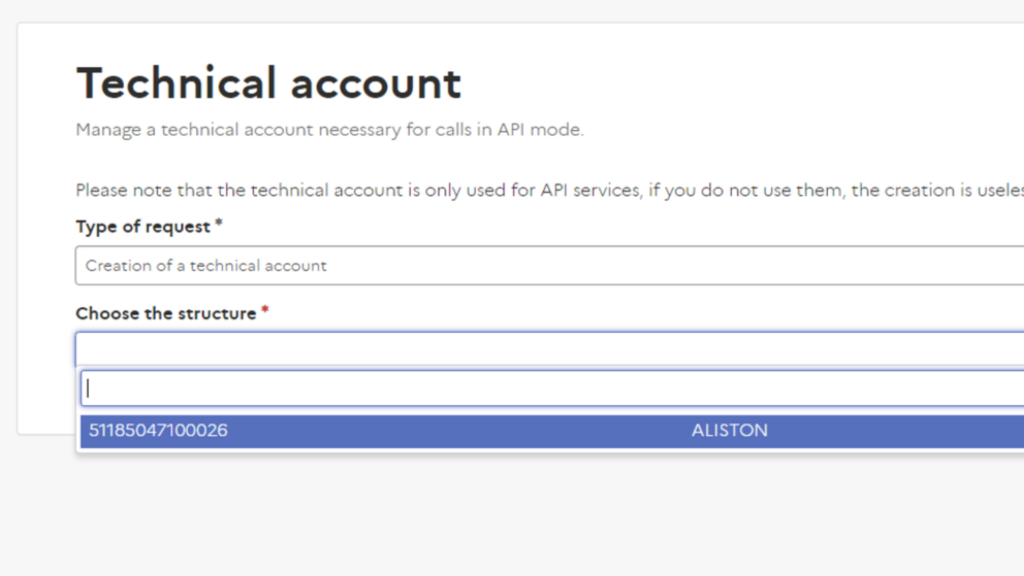
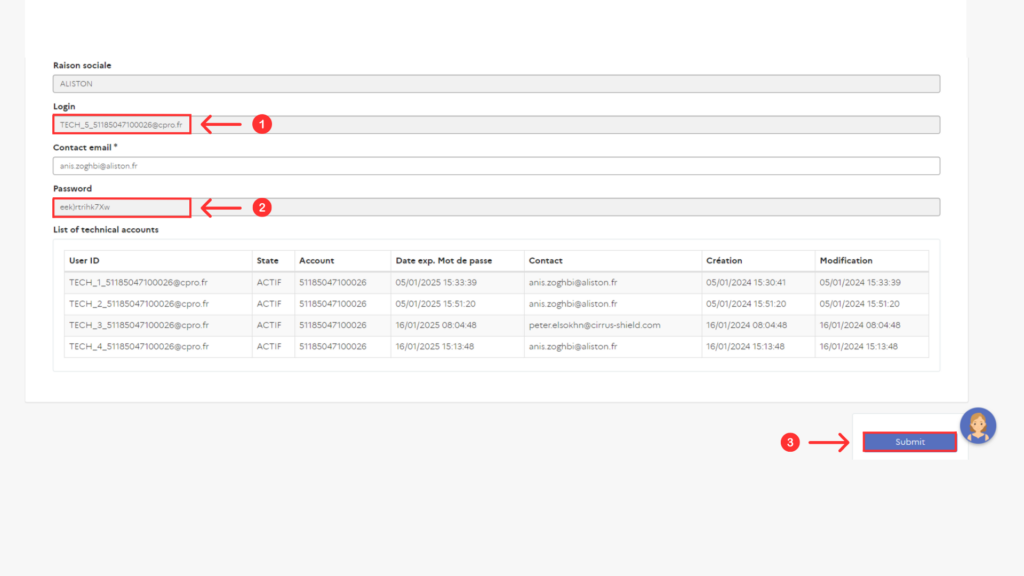
b. Within this service, you can perform various requests. For creating a technical account, click on the dropdown menu and choose “Creation of a technical account.” Next, go to the Structures dropdown and select the structure for which you want to create a technical account.
c. Retrieve the provided “Login” and “Password” credentials. Save this information locally for future use. Afterward, click the “Submit” button.
Upon successful creation of the technical account, allow 20-30 minutes for it to become ready for use.
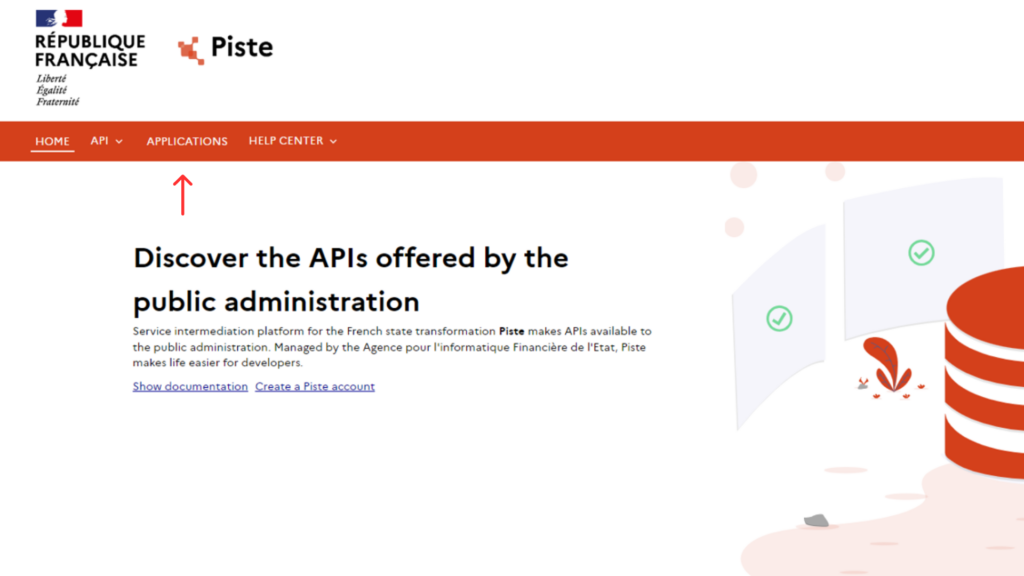
3.Create a Piste Account
Create a piste account by signing in to the piste website, here is the link: https://developer.aife.economie.gouv.fr/component/users/login
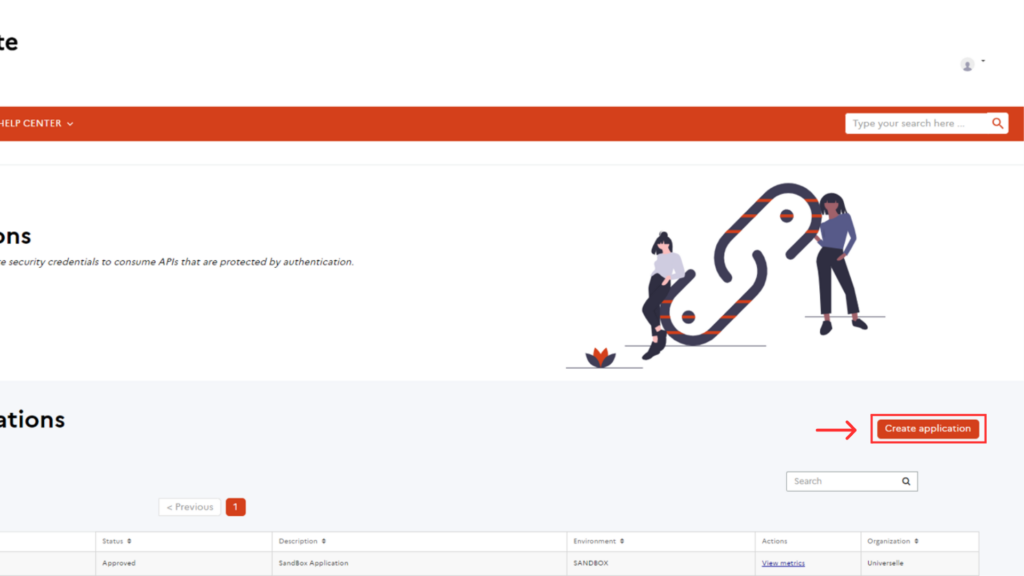
When the creation of the account is successful, you will be able to see a sandbox application being automatically created for test cases by going to the “Applications” tab.
4. Create a production application on Piste
Create an application on piste so it will be linked to chorus pro so we can be able to use the chorus pro features, here are the steps to follow:
a. Navigate to the “Applications” tab
b. Click on the “Create Application” button
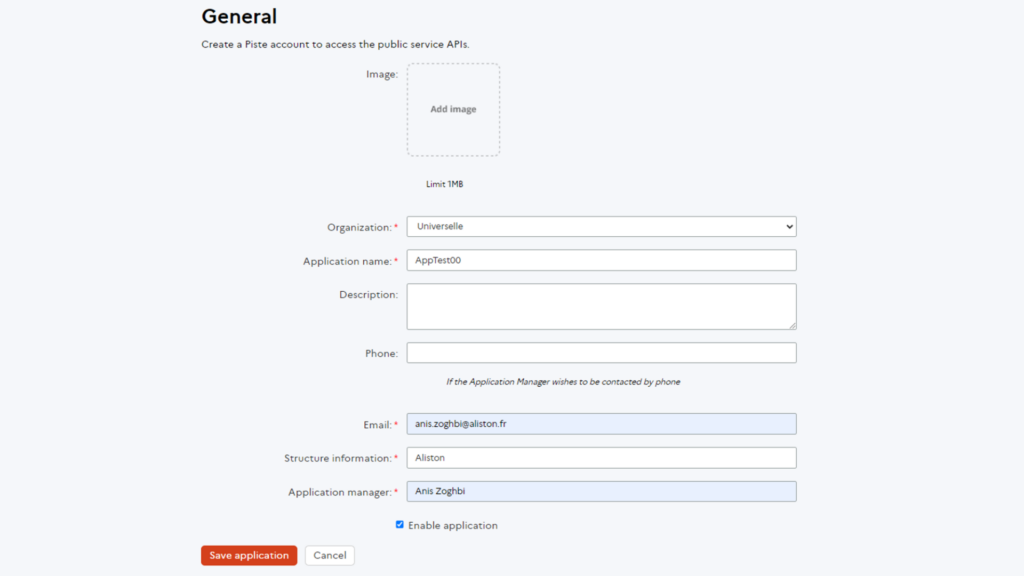
c. Enter the necessary information, then click on the “Save Application” button
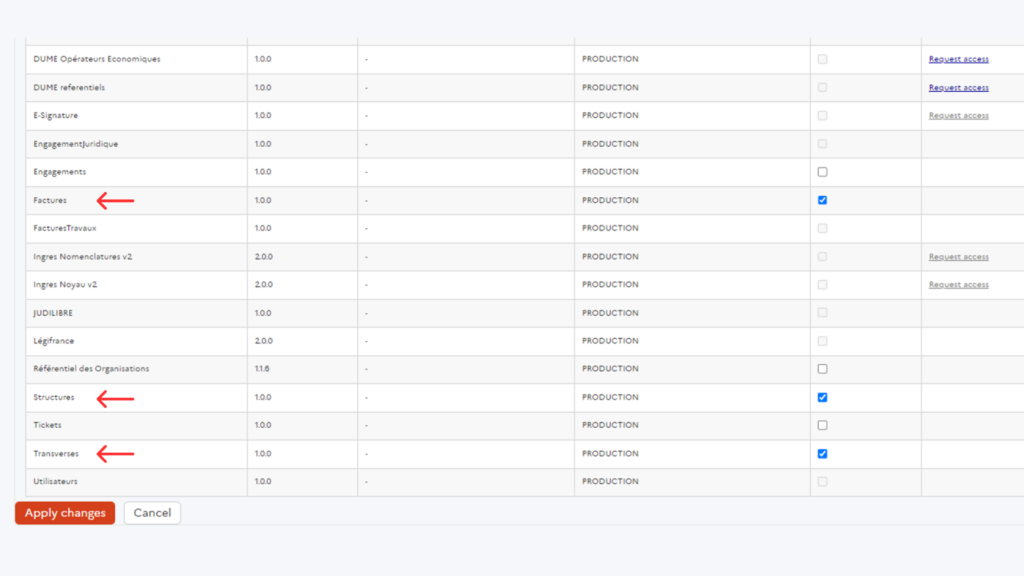
d. Select the APIs below so you can use them: “Factures”, “Structures” and “Transverses”, then click on the “Apply Changes” button. This page can be accessed directly after you create the application
- Piste – Chorus Pro Connection
First, make sure to have the necessary permissions for the Piste-Chorus Pro connection to work. Here are the steps:
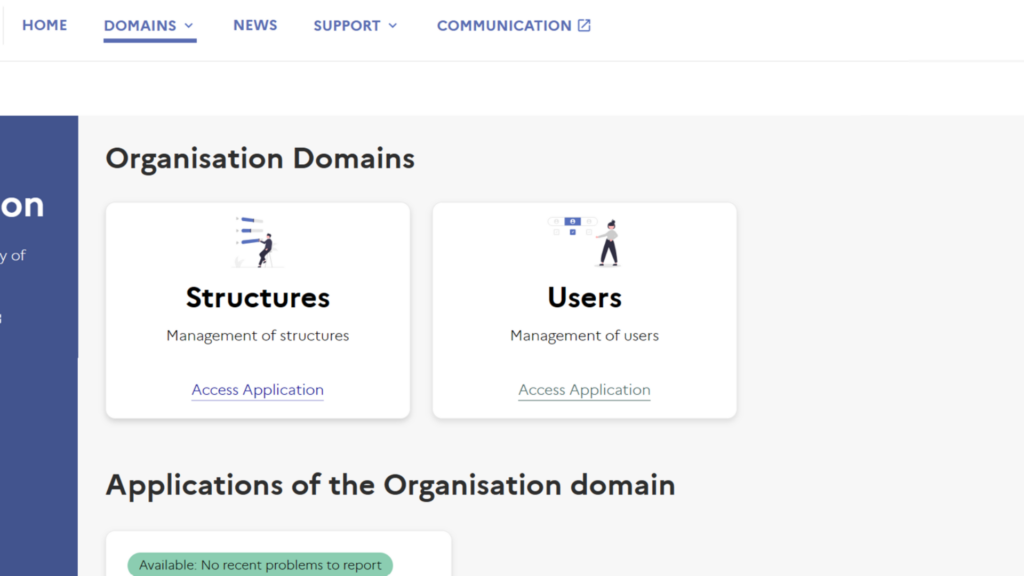
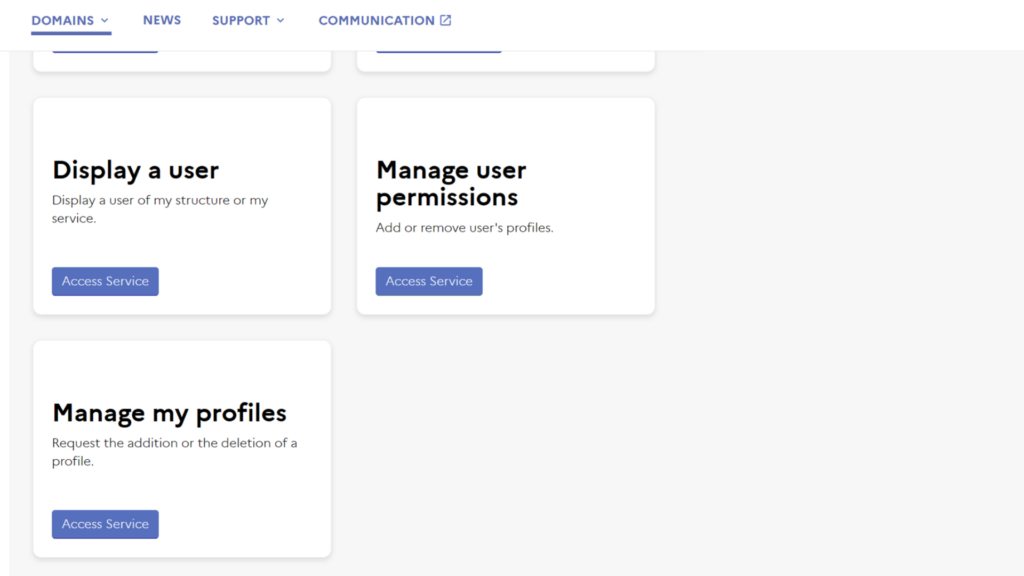
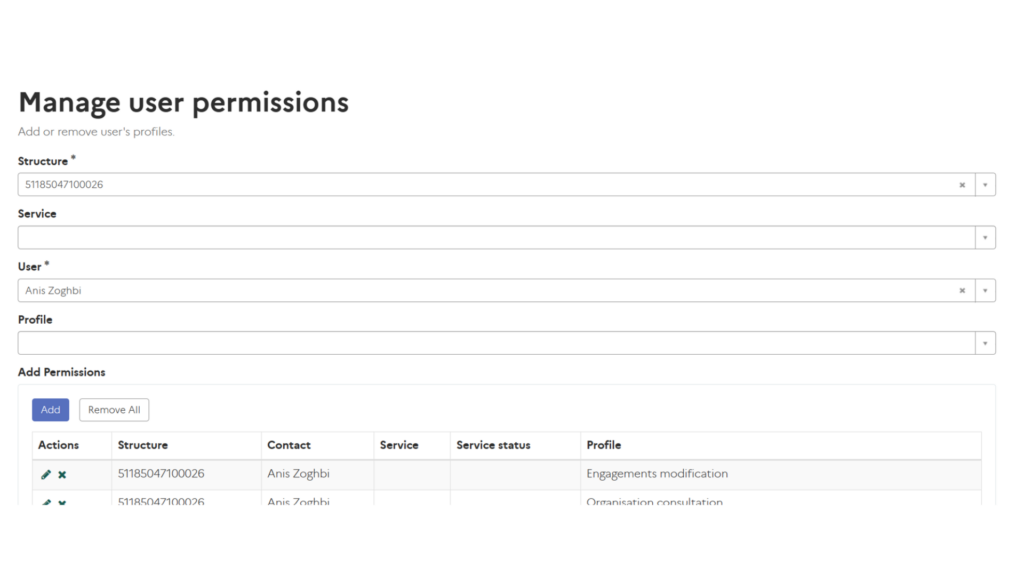
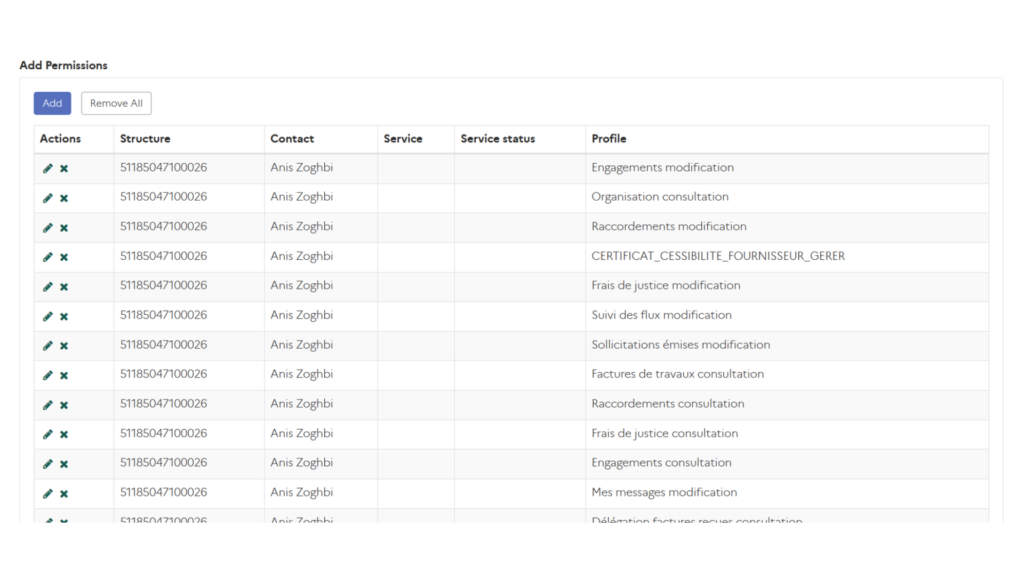
a. Go to the Chorus Pro portal and click on the “Organisation” box, then select the “Users” Domain, and then the “Manage user permissions access service”

b. Make sure to add the permissions “Raccordements modification” and “Raccordements consultation” to the user you want to log in with.
After successfully creating the application and technical account, proceed with connecting them to leverage Chorus Pro features. Here are the steps:
a. Go to the Chorus Pro portal and click on the “Connections” box, then select the “API” box to access the cpro portal
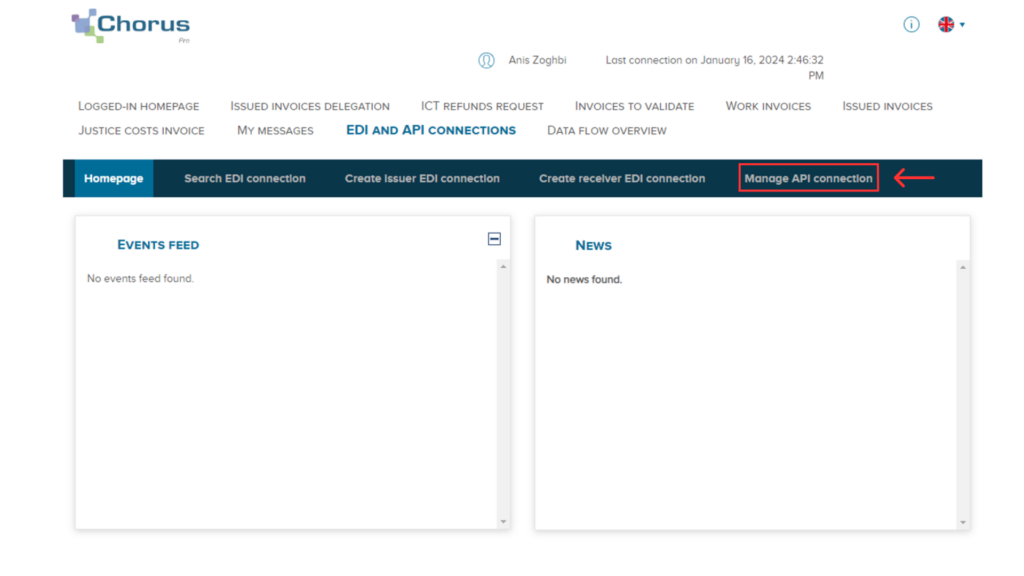
b. Click on the “Manage API connection” tab for the linking process. Ensure you have the exact name of the application created with the technical account’s “Login” credential.
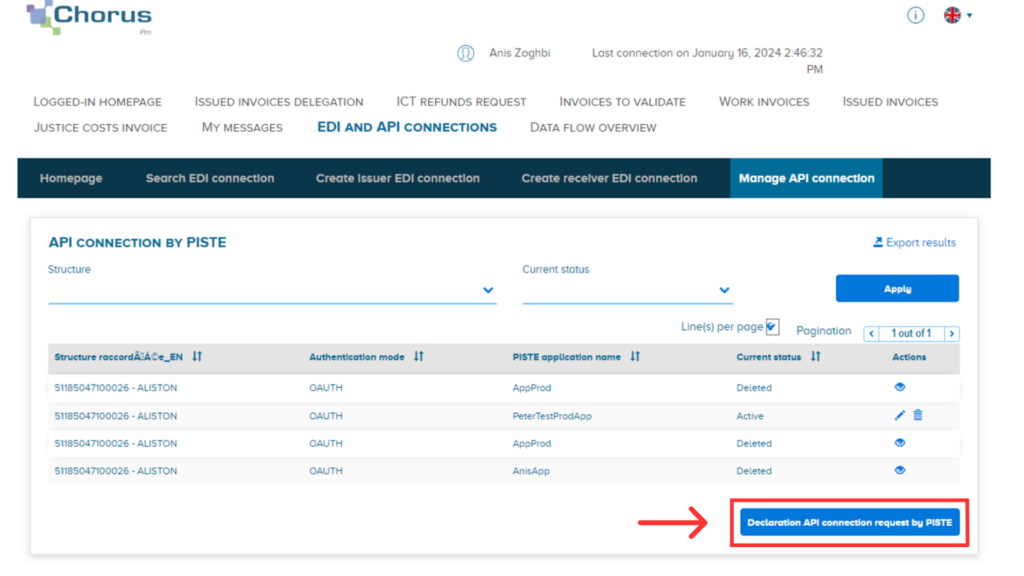
N.B : You can have one active link only
c. Click on “Declaration API connection request by PISTE,” fill in the necessary information, and then click “Validate.”
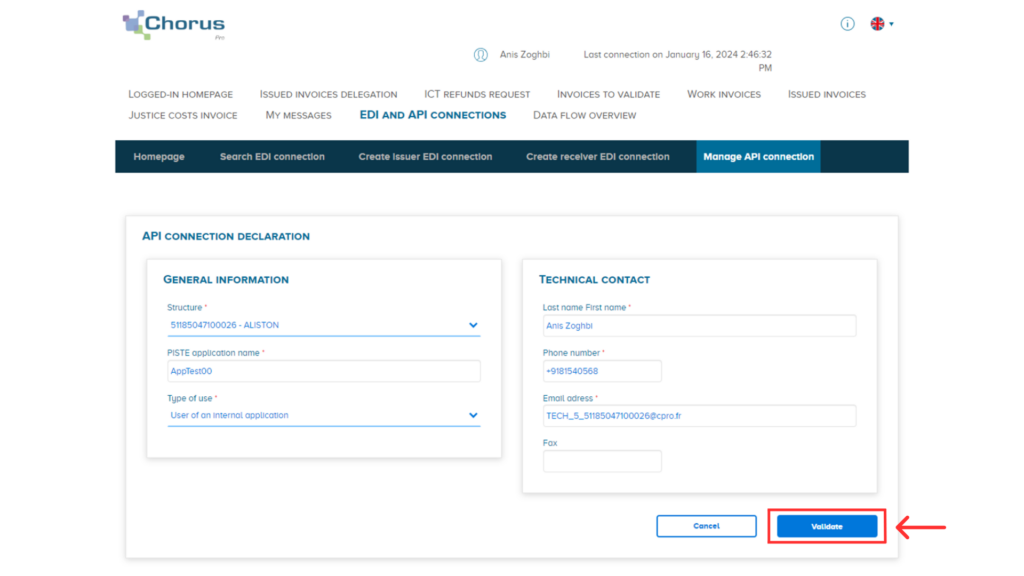
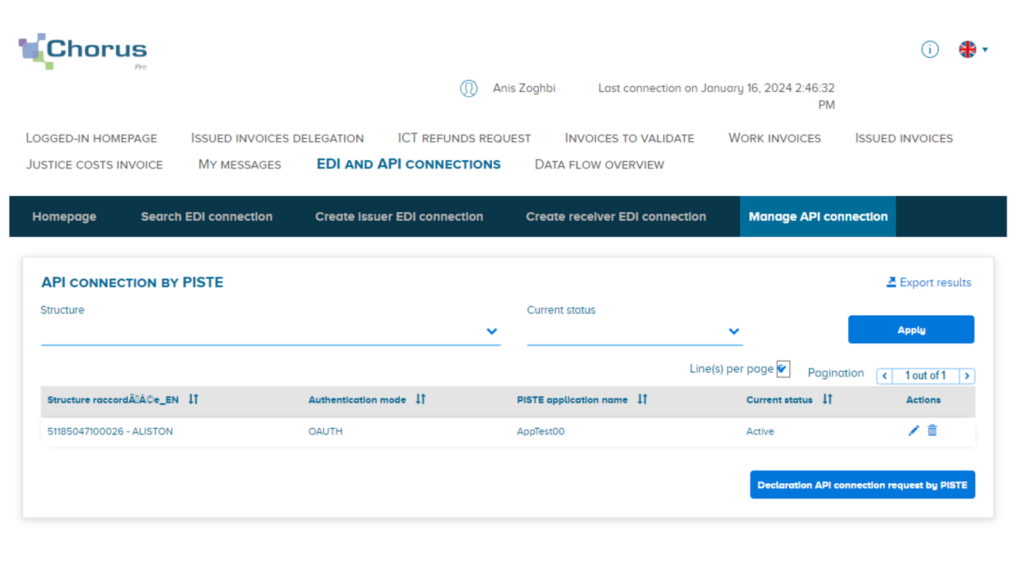
Now, the process of connecting Piste and Chorus Pro is complete.
In Cirrus Shield
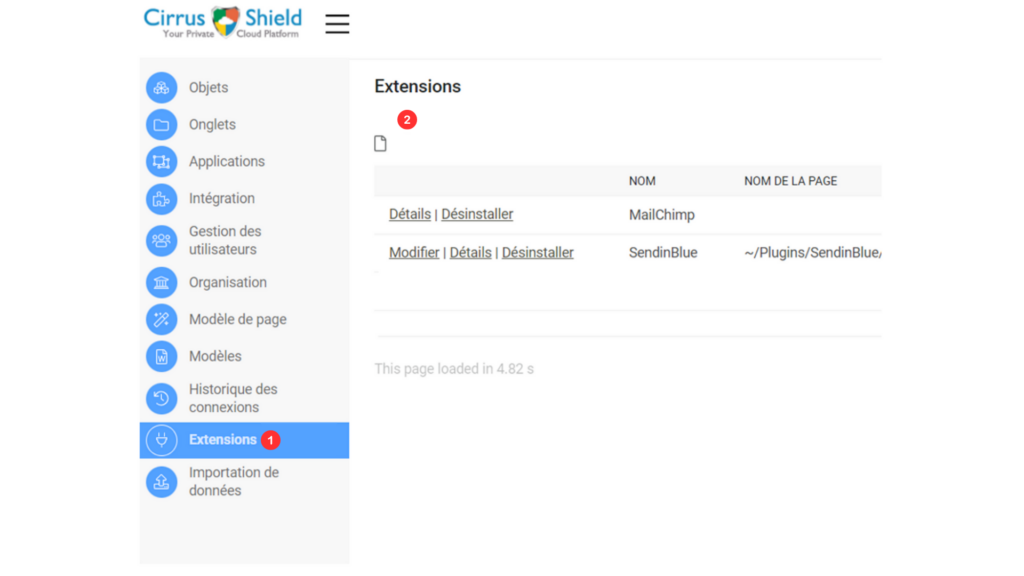
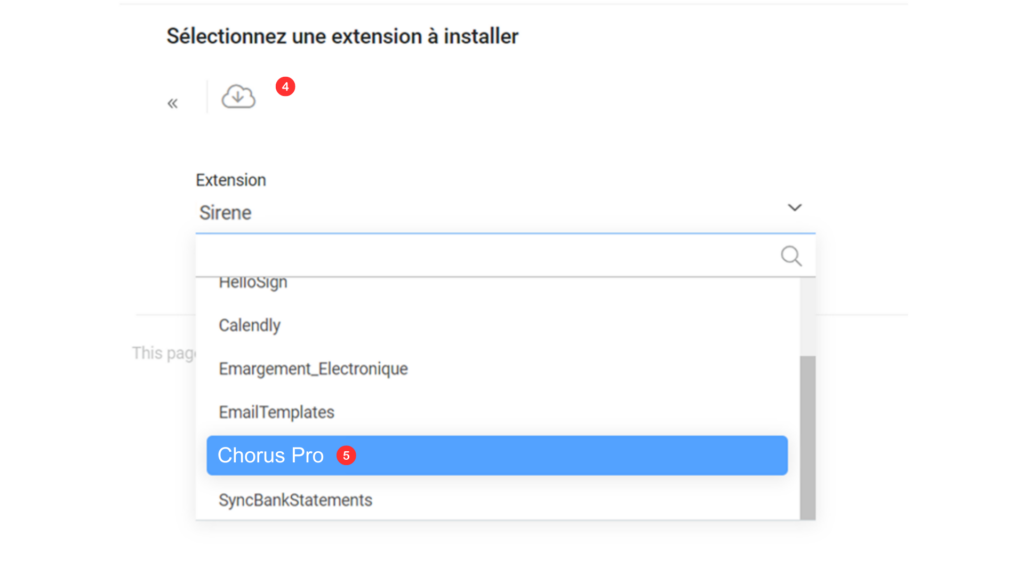
- Install the Chorus Pro Plugin:
Go to “Configuration” in Cirrus Shield, then select “Extensions.” Install the Chorus Pro plugin to enable the integration.
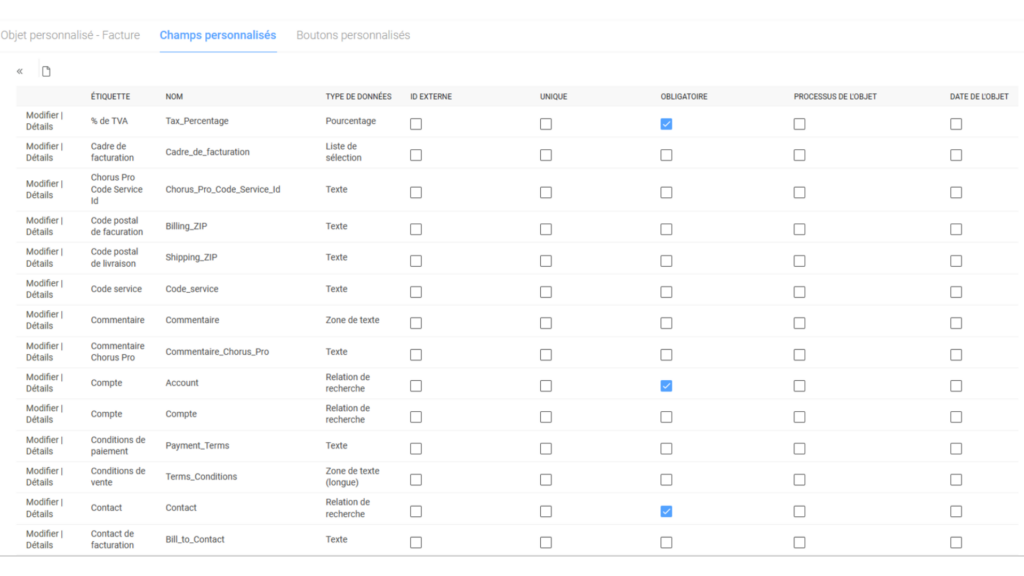
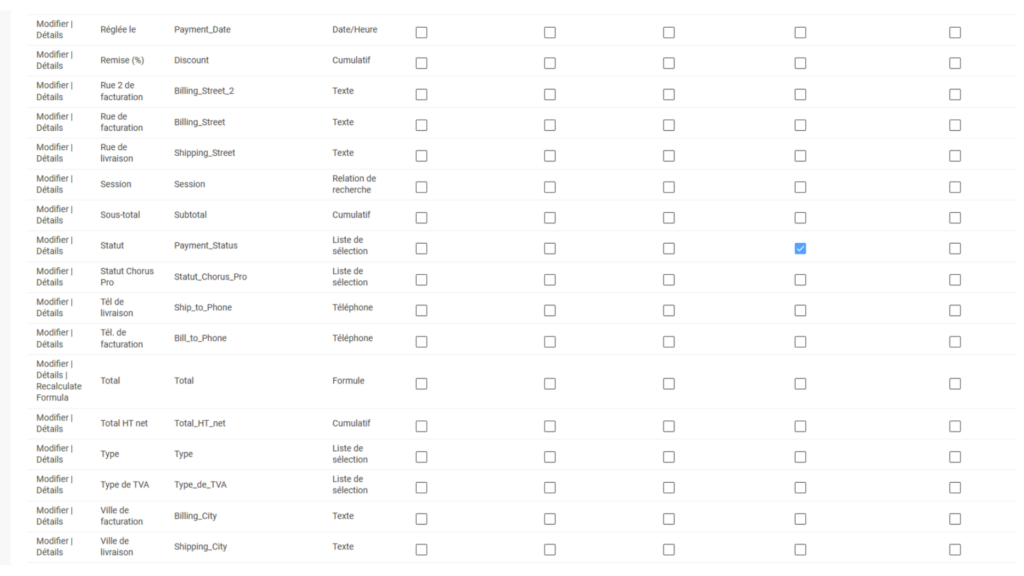
2. Creation of “Invoice”, “Invoice Line Item” & “Account” objects:
To use the Chorus Pro Plugin effectively, ensure that the “Invoice”, “Invoice Line Item” & “Account” objects are created with specific fields and field types. Refer to the images provided below for guidance..
a. Invoice (Fix images)
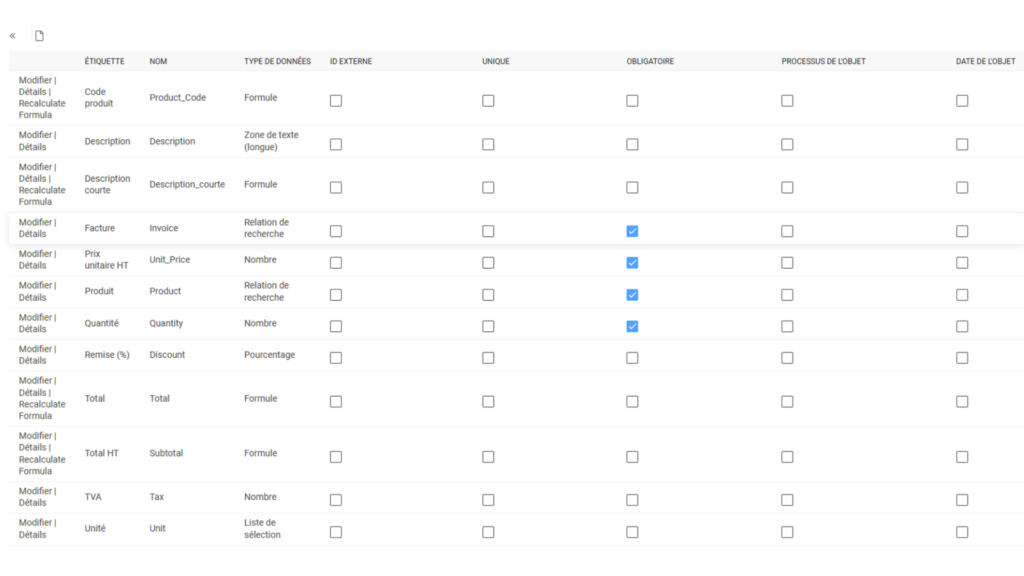
b. Invoice Line Item
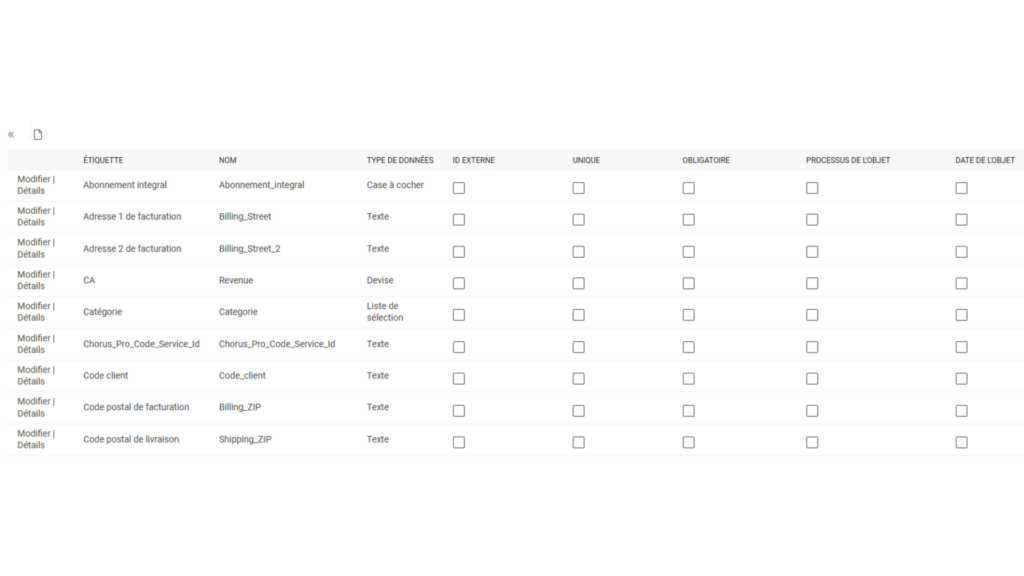
c. Account
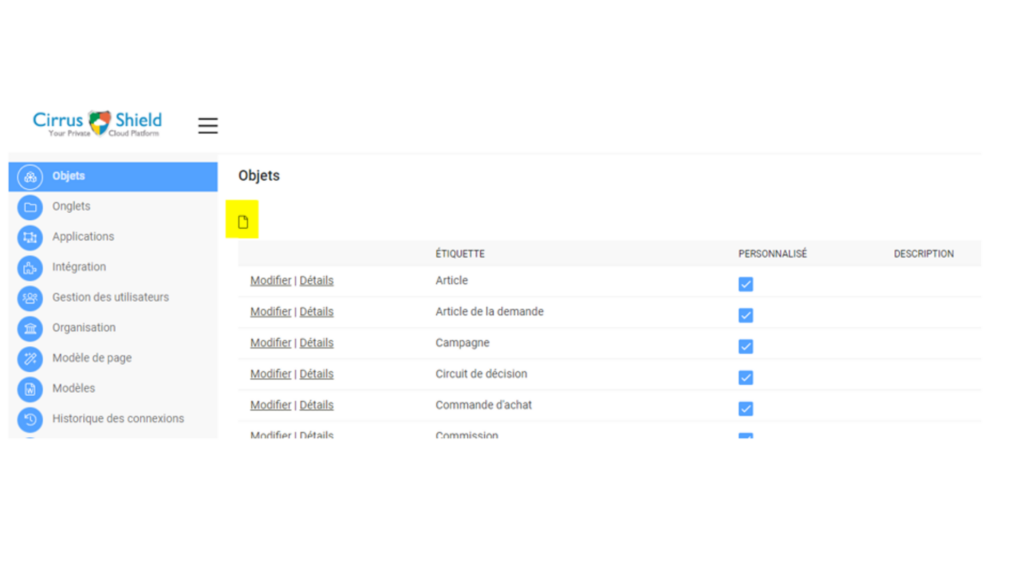
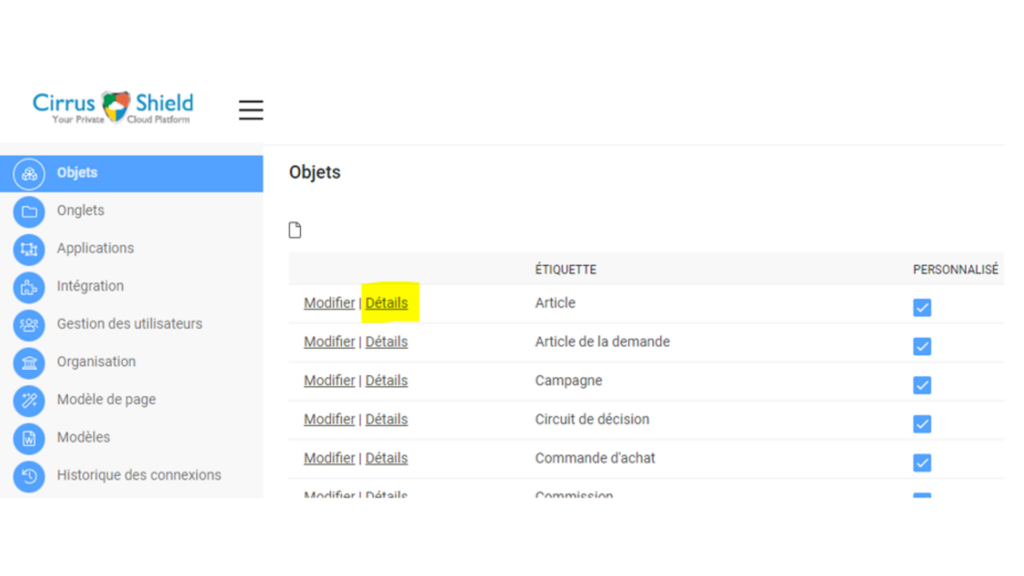
To be able to create an object you must go to Configuration -> Objects and click on the button to create an object
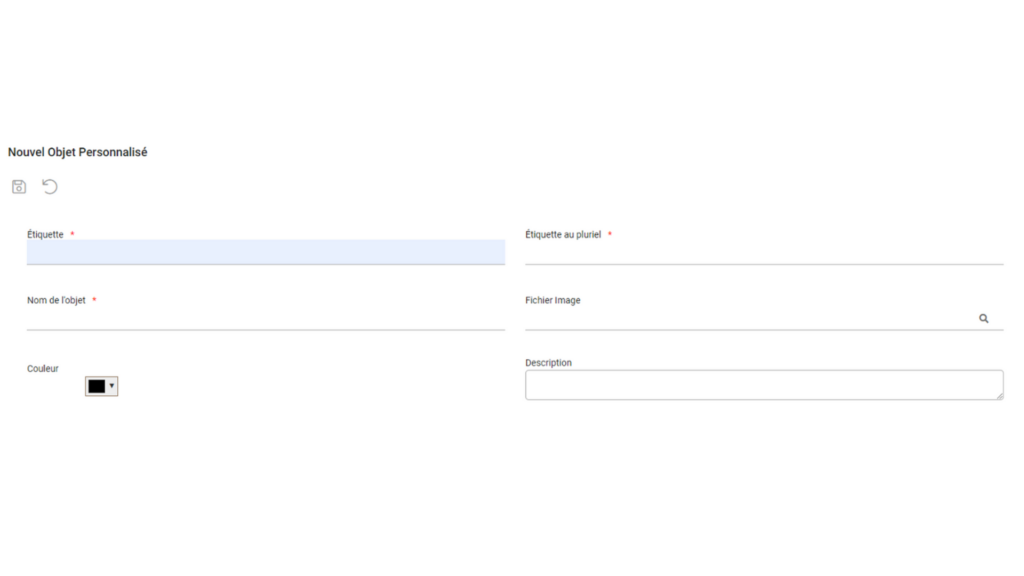
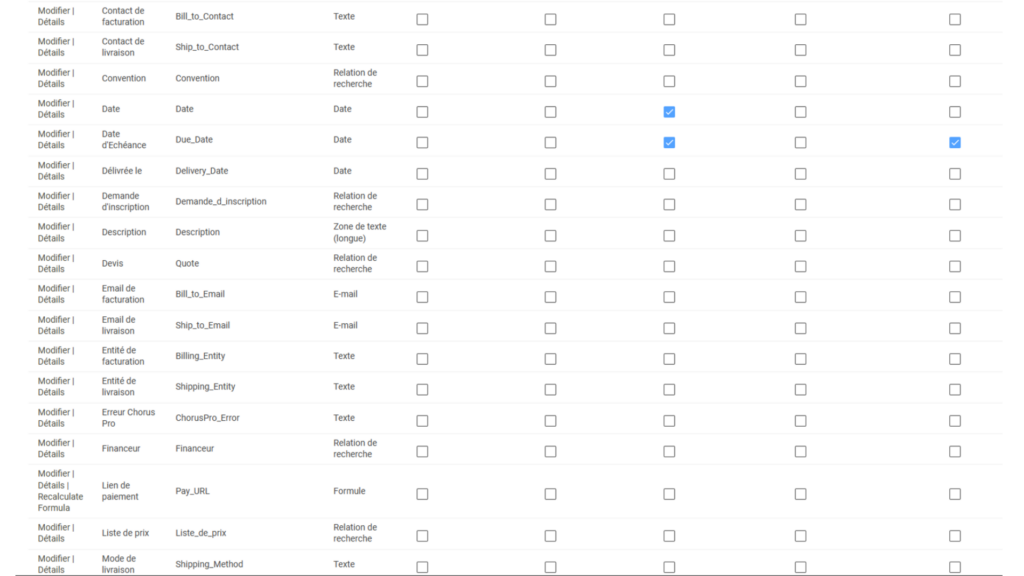
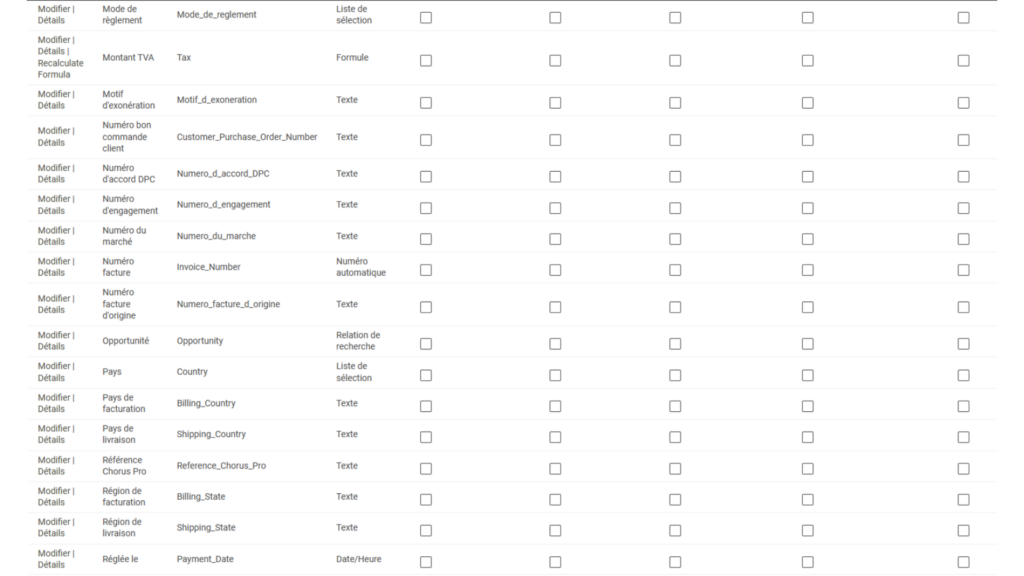
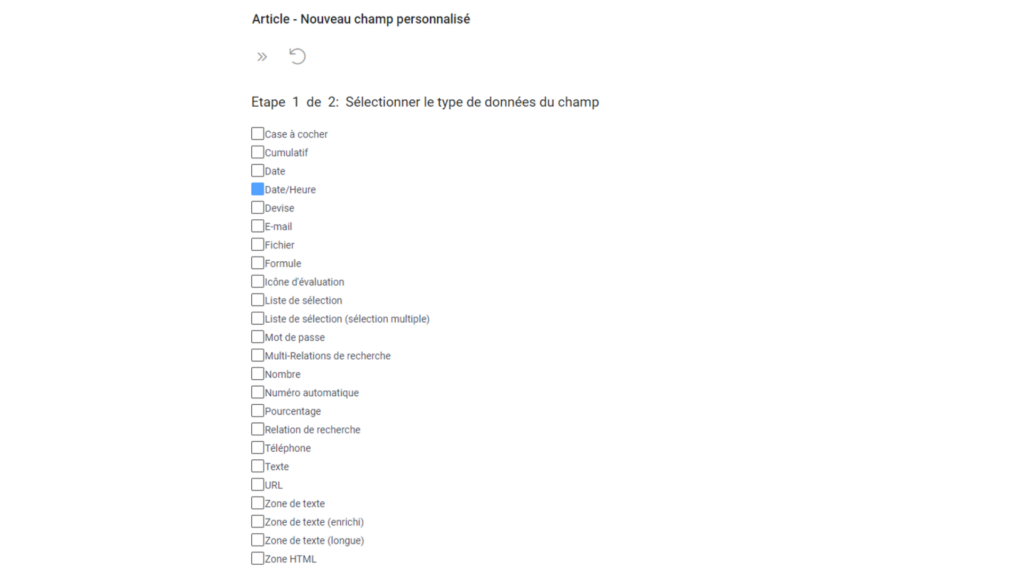
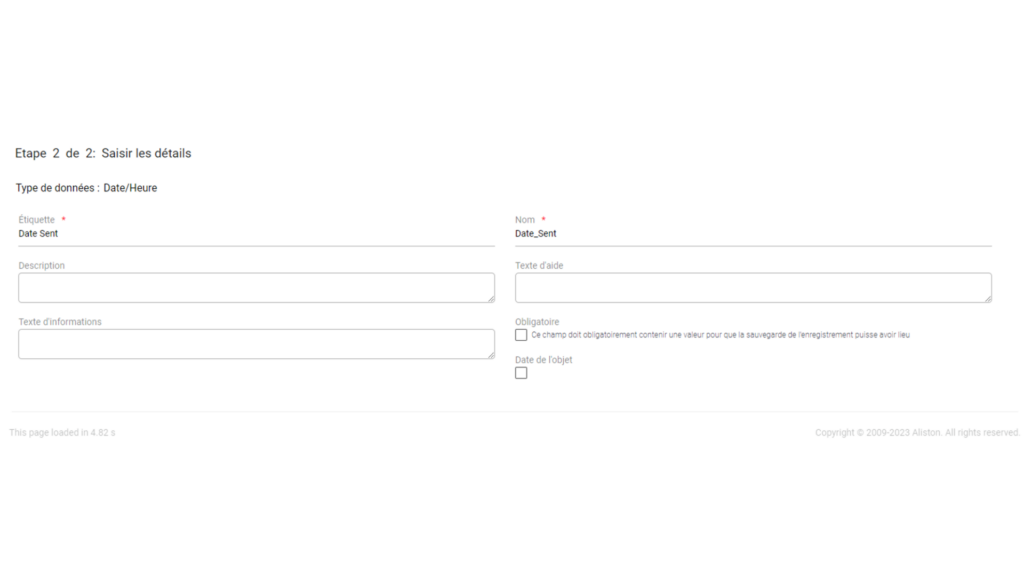
After creating the object, go to “Champs personnalisés” and create a new field, based on the fields that are shown in the image.
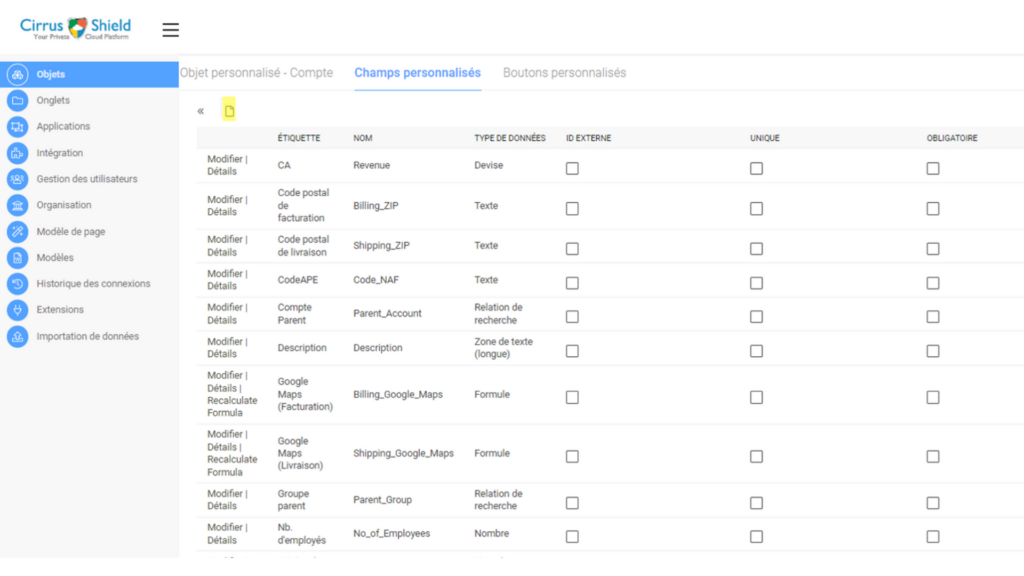
N.B : Make sure to create the fields with the same name and same type of the images regarding the “Invoice”, “Invoice Line Item” and “Account” objects
It should be the same done for the rest of the fields based on their name and field types.
- JavaScript Button:
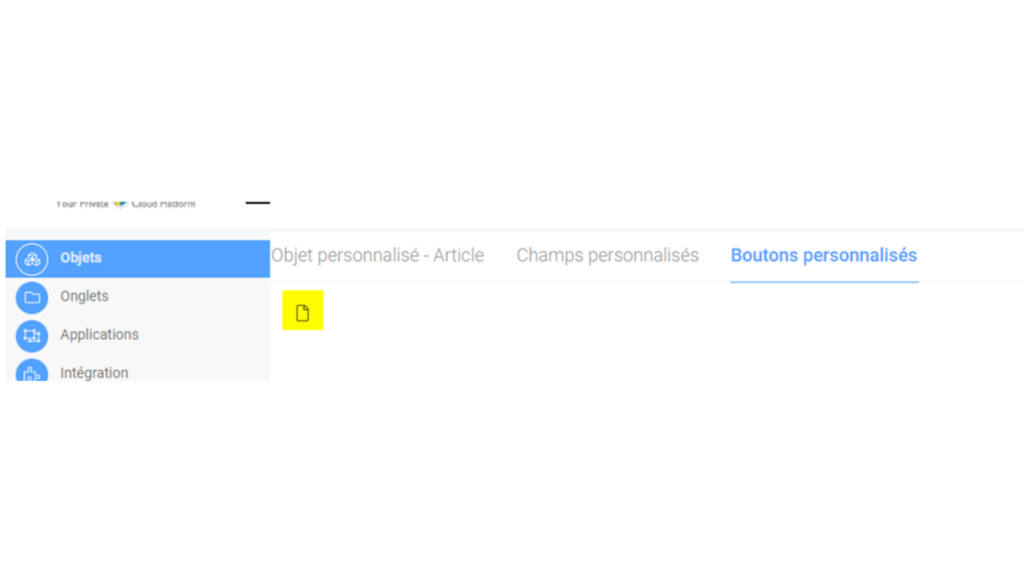
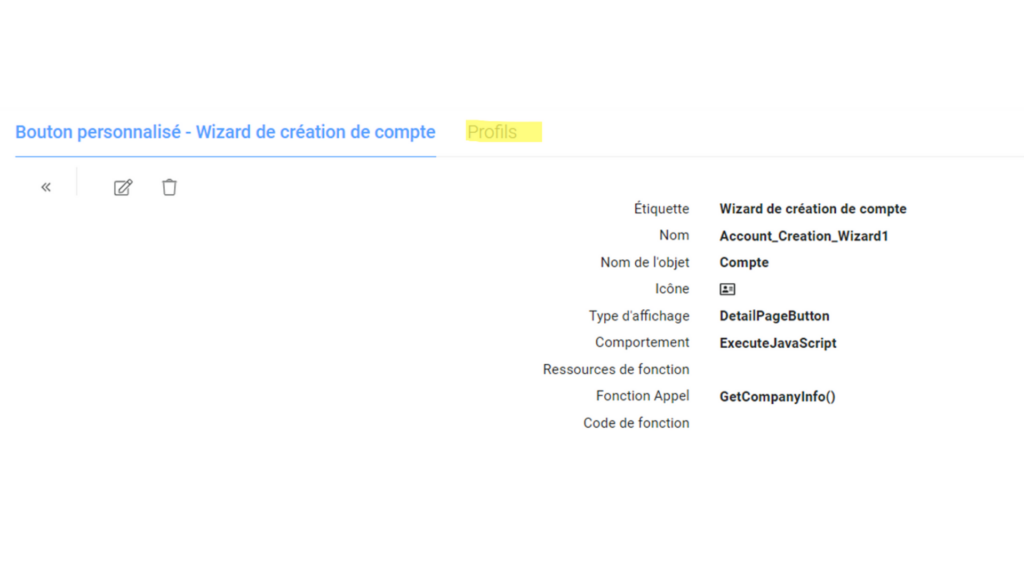
Create a button for the object “Invoice”. To be able to create a JavaScript button, you must go to Configuration -> Object -> Details -> Bouton Personnalisés

Then you create a button with the following information
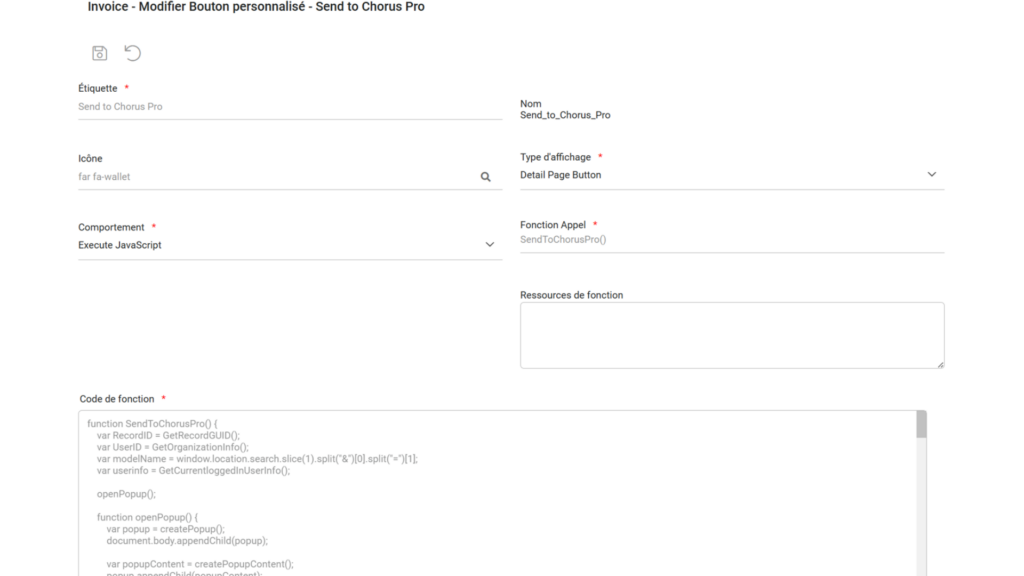
Here is the code that you will be using for the button:
function SendToChorusPro() {
var RecordID = GetRecordGUID();
var UserID = GetOrganizationInfo();
var modelName = window.location.search.slice(1).split("&")[0].split("=")[1];
var userinfo = GetCurrentloggedInUserInfo();
openPopup();
function openPopup() {
var popup = createPopup();
document.body.appendChild(popup);
var popupContent = createPopupContent();
popup.appendChild(popupContent);
var closeBtn = createCloseButton(popup);
popupContent.appendChild(closeBtn);
var loadingSpinner = createLoadingSpinner();
popupContent.appendChild(loadingSpinner);
var iframe = createIframe(RecordID, UserID, modelName, userinfo, loadingSpinner);
popupContent.appendChild(iframe);
}
function createPopup() {
var popup = document.createElement("div");
popup.id = "myPopup";
popup.style.cssText = "position: fixed; z-index: 9999999; left: 50%; top: 50%; transform: translate(-50%, -50%); width: 100%; height: 100%; overflow: auto; background-color: rgba(0,0,0,0); display: flex; justify-content: center; align-items: center;";
return popup;
}
function createPopupContent() {
var popupContent = document.createElement("div");
popupContent.id = "popupContent";
popupContent.style.cssText = "background-color: white; padding: 20px; border: 1px solid #888; width: 80%; height: 85%; position: relative;";
return popupContent;
}
function createCloseButton(popup) {
var closeBtn = document.createElement("span");
closeBtn.innerHTML = "×";
closeBtn.style.cssText = "position: absolute; top: 0; left: 98%; font-size: 28px; font-weight: bold; cursor: pointer;";
closeBtn.onclick = function () {
popup.style.display = "none";
// Refresh the page upon closing the popup
location.reload(true); // Pass true to force a reload from the server
};
return closeBtn;
}
function createLoadingSpinner() {
var loadingSpinner = document.createElement("div");
loadingSpinner.id = "loadingSpinner";
loadingSpinner.style.cssText = "position: absolute; top: 50%; left: 50%; transform: translate(-50%, -50%);";
// Add a simple loading spinner using CSS
loadingSpinner.innerHTML = '<div class="spinner"></div>';
var style = document.createElement("style");
style.textContent = `
#loadingSpinner .spinner {
border: 4px solid rgba(0, 0, 0, 0.1);
border-left: 4px solid #3498db;
border-radius: 50%;
width: 40px;
height: 40px;
animation: spin 1s linear infinite;
}
@keyframes spin {
0% { transform: rotate(0deg); }
100% { transform: rotate(360deg); }
}
`;
loadingSpinner.appendChild(style);
return loadingSpinner;
}
function createIframe(RecordID, UserID, modelName, userinfo, loadingSpinner) {
var iframe = document.createElement("iframe");
// Show loading spinner before the iframe is loaded
loadingSpinner.style.display = "block";
// Hide the loading spinner after the iframe has finished loading
iframe.addEventListener("load", function () {
loadingSpinner.style.display = "none";
});
iframe.src = `https://choruspro.cirrus-shield.net/${userinfo["Language"]}/SendInvoice?orgid=${UserID["Id"]}&objectName=${modelName}&RecordGuid=${RecordID}`;
iframe.style.cssText = "width: 100%; height: 100%; border: none;";
return iframe;
}
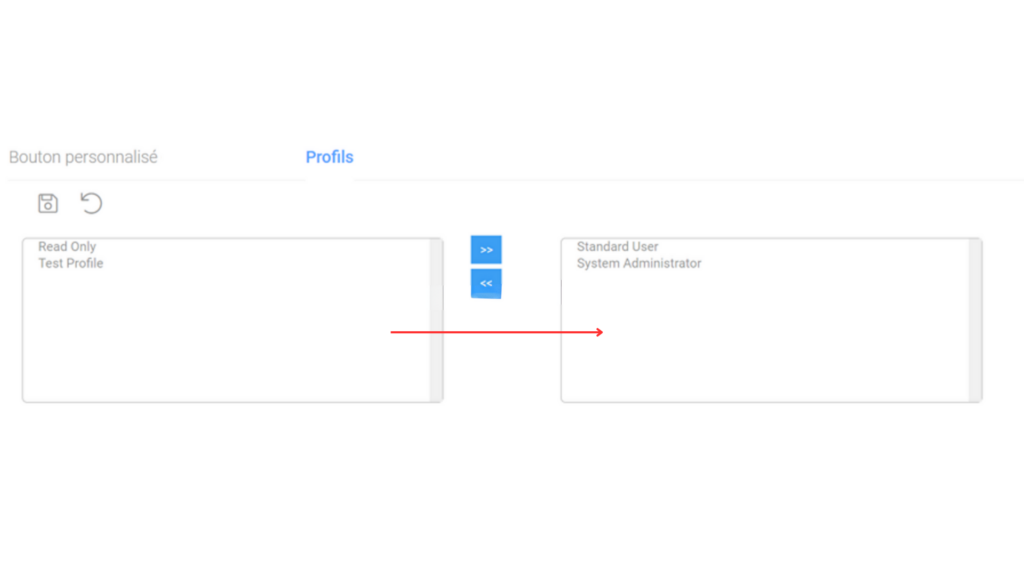
}Make sure to change the visibility of the button based on the users that will be using it, you can do this by going to the object where you created the button -> button details -> Profils
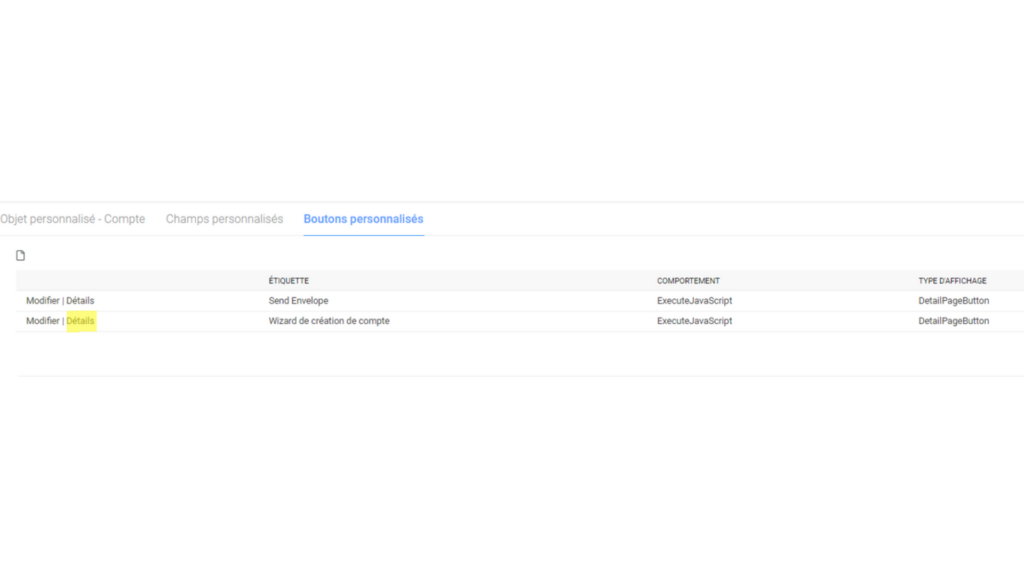
And finally, you will be able to see the button in the details page of the record of the specific chosen object
Configuration
To configure the plugin that you installed, you will have to go to the details of the Chorus Pro installed plugin.
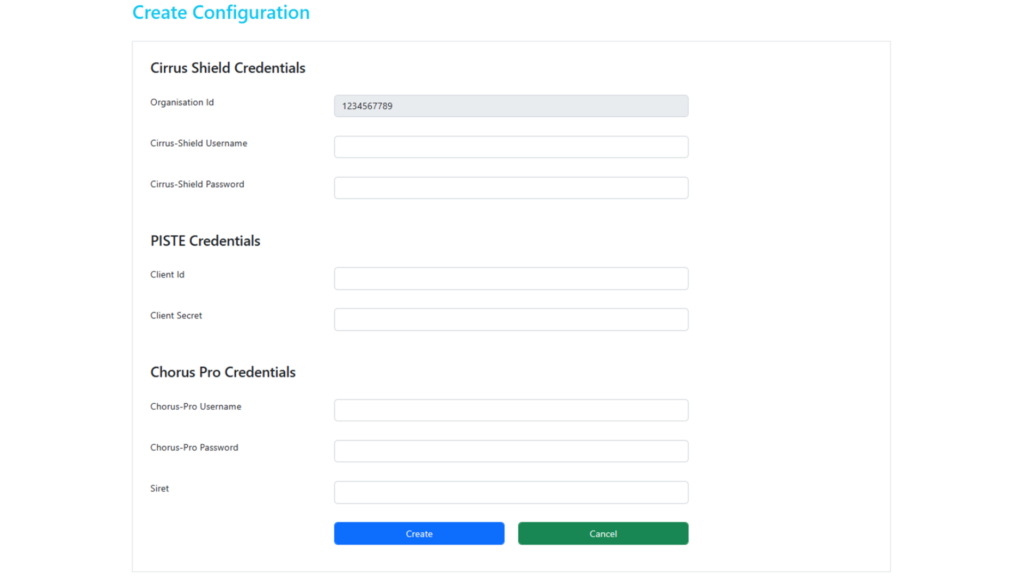
Provide your Cirrus-Shield credentials (Username & Password), Piste application OAuth credentials (Client ID & Client Secret), Chorus Pro technical account credentials (Chorus-Pro Username & Chorus-Pro Password), along with the Siret representing the invoicing company. Click “Create” to save your configuration to Cirrus-Shield.