The integration between Cirrus Shield and Calendly allows you to spend less time on scheduling your appointments with your leads and customers. For instance, when a lead schedules a meeting with Calendly, Cirrus Shield automatically creates the lead and corresponding appointment in your CRM.
Follow these steps to establish the connection between Cirrus Shield and Calendly:
1- Create a Calendly Premium Account
- Create an account on Calendly or use your current account. You will need at minimum a Professional version of Calendly for the integration with Cirrus Shield to work.
- Once connected to Calendly, click on the “Integration” menu at the top.
- Click on “API & Webhooks”.
- Click on “Get a token now”.
- The following message will appear “Please be aware that personal access tokens you create as an admin will grant access to Calendly data for everyone in your organization.” Click on Continue
- Name the token
- Copy your token and save it in a separate note.
2- Connect to you Cirrus Shield CRM account
- Log in to Cirrus Shield by entering your username and password.
- Click on your name on the right side > Setup > Plugins > New.
- Choose “Calendly” from the drop-down list and Save
- Click on Calendly Detail button
- Insert the token you copied previously in the “AccessToken” field.
- For security reasons, enter your Cirrus Shield username and password then Save.
3- Visualize the created meeting in Cirrus Shield CRM
Let’s take this example:
- The lead or contact “François Brodeur” places an appointment on your Calendly Agenda on Thursday 03 November 2021 from 12:00 to 12:30, adds his manager Ms. Lavoie as a guest and chooses Zoom as the meeting place.
- Once this action has been carried out on the part of the prospect / contact, you will receive an email notification indicating that a new event has been created in your Cirrus Shield calendar in the “Meetings” Object.
- Log into your Cirrus Shield account and click on the “Meetings” module.
- The meeting/appointment appears with the start date, the end date and the Zoom link.

- Click on the meeting then on Participants to see who are the invitees:
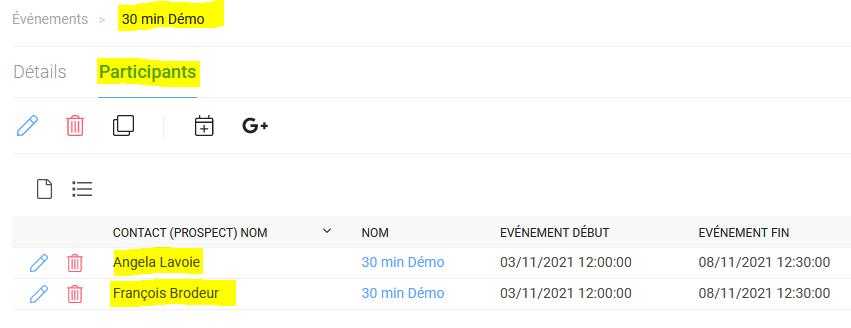
Note that if the participant doesn’t exist in the CRM, Cirrus Shield will automatically create him in the “Leads” module with his first name, last name and email. If he already exists, then the meeting/appointment is added to this Lead or Contact record.
4- The lead updates the meeting
If the lead reschedules the appointment on Calendly, this same meeting is updated in your CRM with a new date and Zoom link.
If the lead deletes the appointment on Calendly, the meeting is deleted in your CRM.