Avec son extension WordPress, Cirrus Shield vous permet de mettre ligne des formulaires intégrés à votre site web qui créent automatiquement des enregistrements dans votre CRM et vous notifient par mail à chaque nouvelle soumission.
La mise en place d’un formulaireen ligne passe par 7 étapes :
1- Installation de l’extension Cirrus Shield dans WordPress.
Commencez par télécharger l’extension Cirrus Shield en cliquant sur le bouton suivant:
Télécharger l’extension Cirrus Shield pour WordPress
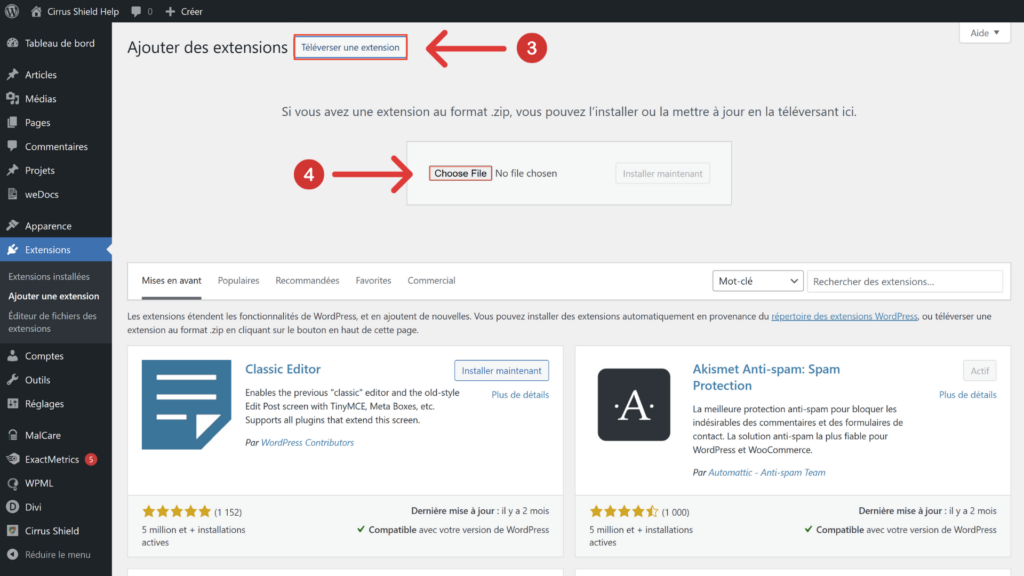
Puis, connectez-vous à votre site WordPress et cliquez sur l’onglet « Extensions » (1), « Ajouter » (2) puis « Téléverser une extension » (3).
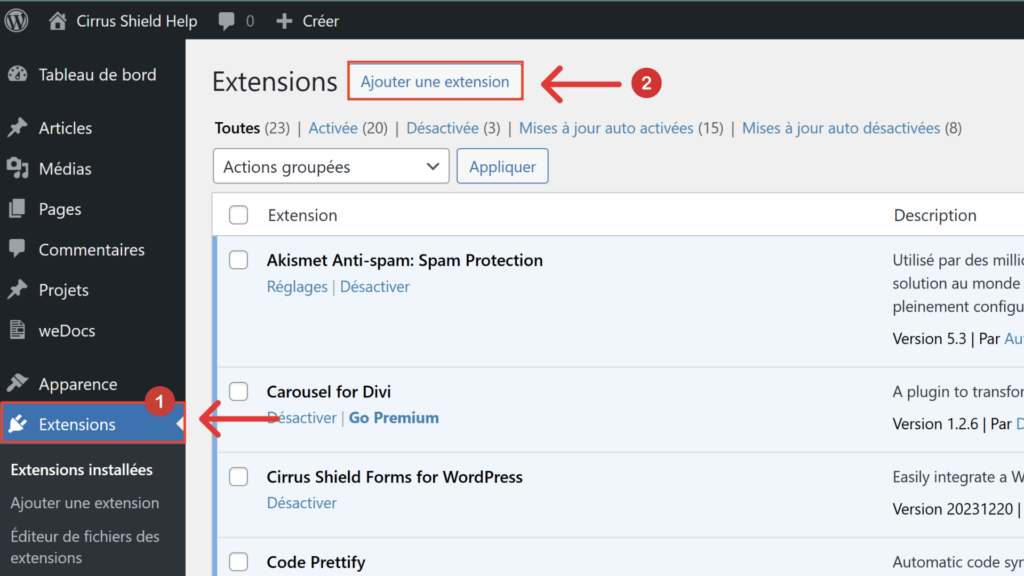
Chargez le fichier .zip
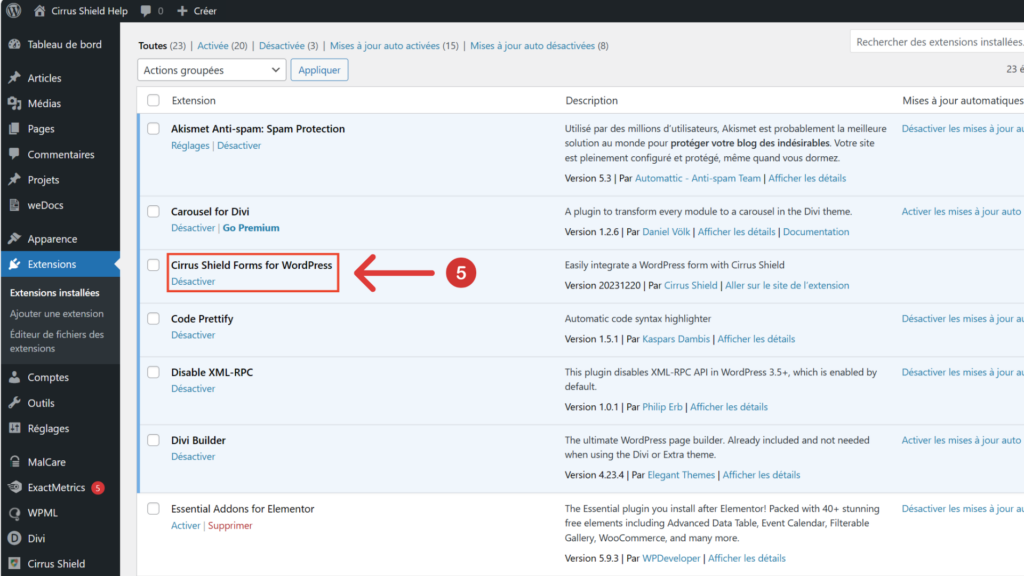
installez-le (4) et activez-le (5).
2- Connection à votre environnement Cirrus Shield
Une fois l’extension installée, un onglet « Cirrus Shield » (6) appraît dans WordPress.
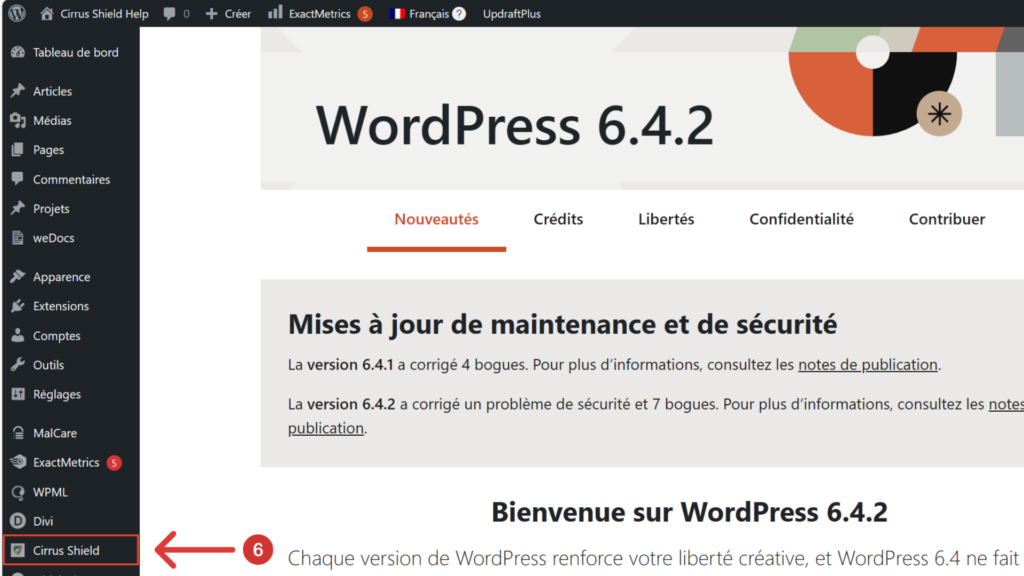
Cliquez dessus et connectez-vous en insérant votre nom d’utilisateur et votre mot de passe CRM.
La connexion à votre environnement CRM vous permet de créer des formulaires adaptés à votre modèle de données. En effet, les formulaires reprendront les objets et les champs présents dans votre environnement Cirrus Shield.
3- Création d’un formulaire
Prenons pour exemple la création d’un formulaire qui permettra à vos prospects de faire une demande de démonstration de votre solution.
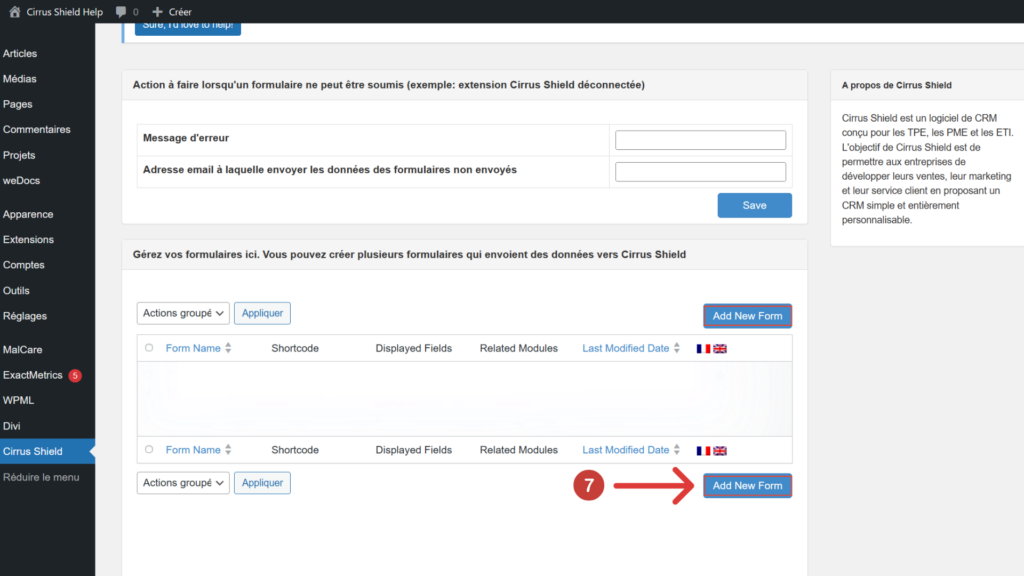
Pour créer un formulaire, cliquez sur le bouton « Add New Form » (7).
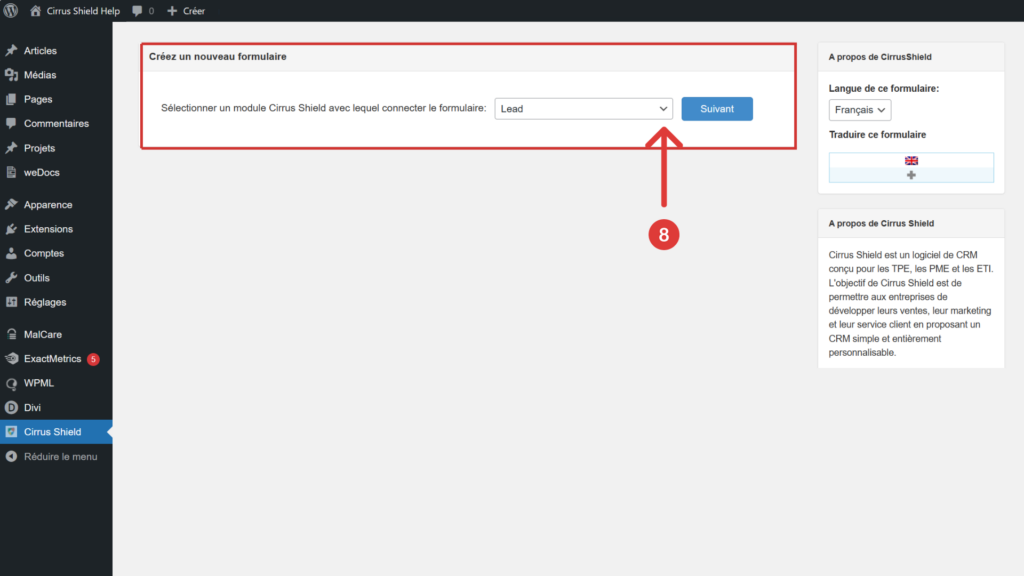
Sélectionnez l’objet Cirrus Shield qui recevra les données de votre formulaire. Dans notre cas, l’objet « Prospect » (8).
L’interface de création du formulaire comprend les éléments suivants :
- Un éditeur html qui vous permet de modifier directement le code (9).
- Un menu «Ajouter un nouveau champ» pour ajouter des nouveaux champs à votre formulaire (10).
- Un aperçu du formulaire pour prévisualiser vos modifications (11).
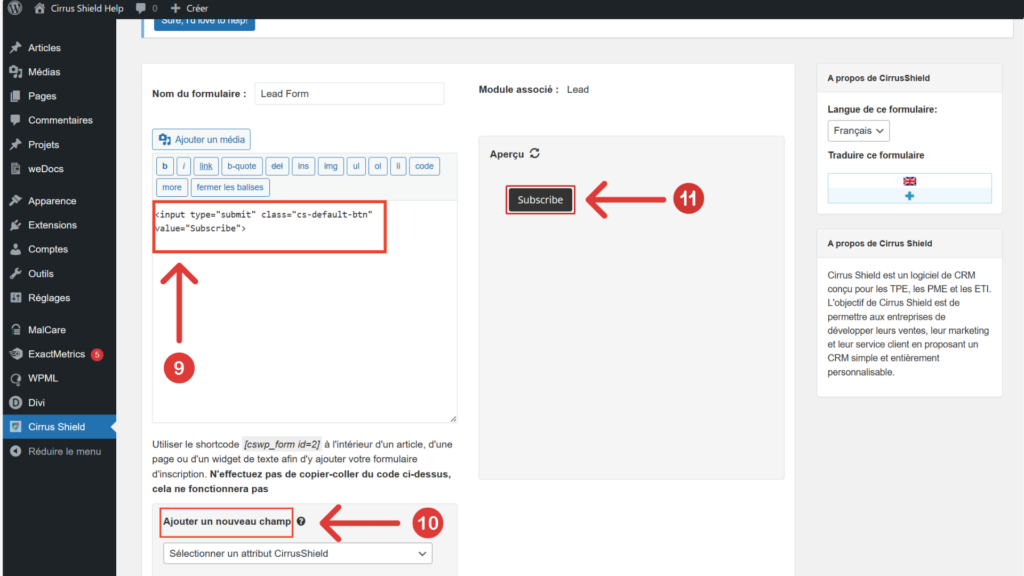
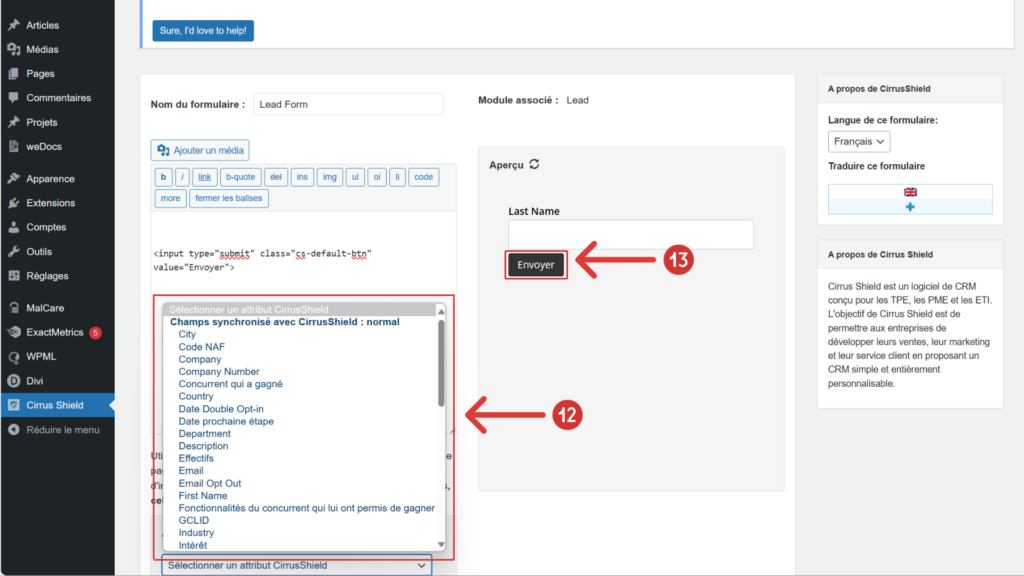
Pour ajouter un nouveau champ, il vous suffit de le sélectionner dans la liste déroulante « Ajouter un nouveau champ » et de cliquer sur « Ajouter au formulaire ». Le champ sera automatiquement ajouté à votre formulaire (éditeur html).
A noter que cette liste déroulante ne contient pas les champs calculés de Cirrus Shield (comme les formules, les champs cumulatifs et les champs de type numéro automatique) ainsi que ceux qui font appel à un autre objet (relation de recherche et multi-relation de recherche) (12).
Les intitulés des champs présents dans le formulaire sont personnalisables. Vous pouvez, par exemple, renommer le bouton « Submit » en « Envoyer » (13).
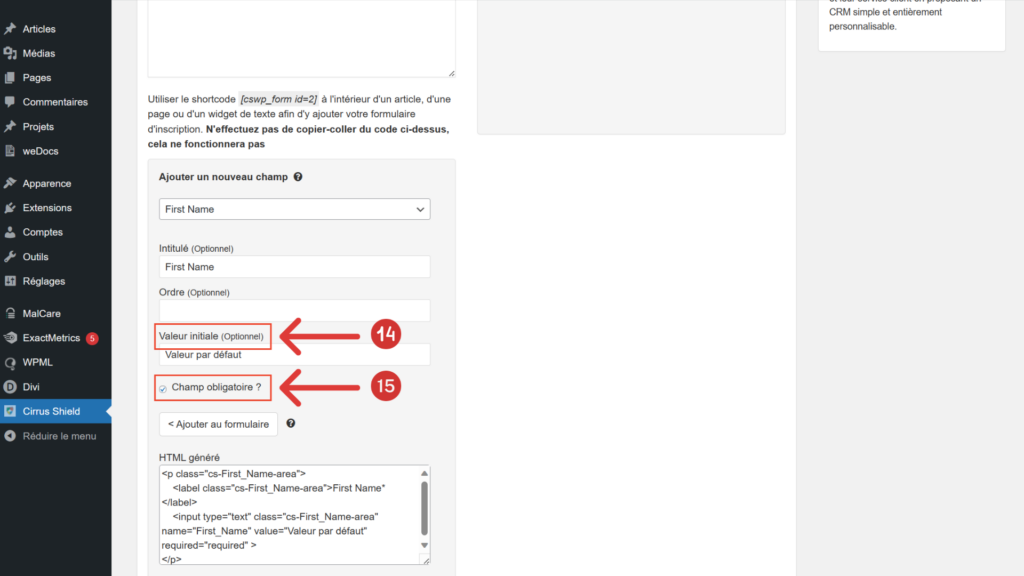
Vous pouvez rendre le champ obligatoire ou bien insérer une valeur par défaut dans le champ (14 et 15).
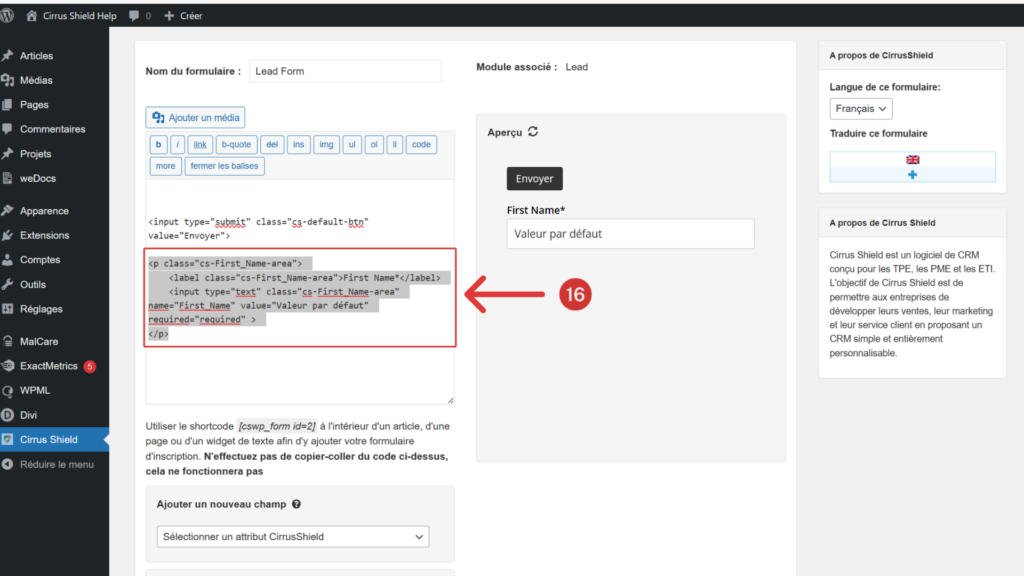
Pour changer l’ordre des champs, sélectionnez le champ de l’ouverture du <p à la fermeture du </p, et faites un couper-coller à l’emplacement souhaité (16).
Note sur les éléments de type checkbox
Vous devez vous assurer d’avoir une valeur [value=”1″] dans le code HTML d’une case à cocher (input type=”checkbox”). En effet l’attribut value est commun à tous les champs de type <input>; cependant cela est utilisé de manière spéciale pour les champs inputs de type checkbox: lorsqu’un formulaire est soumis, seules les case à cocher (checkboxes) qui sont cochées sont envoyées au serveur et la valeur envoyée est celle de l’attribut value. Si l’attribut value n’est pas spécifié, la valeur on est envoyée par défaut et cette valeur n’est pas acceptée par Cirrus Shield qui s’attends à value=1 pour une case cochée.
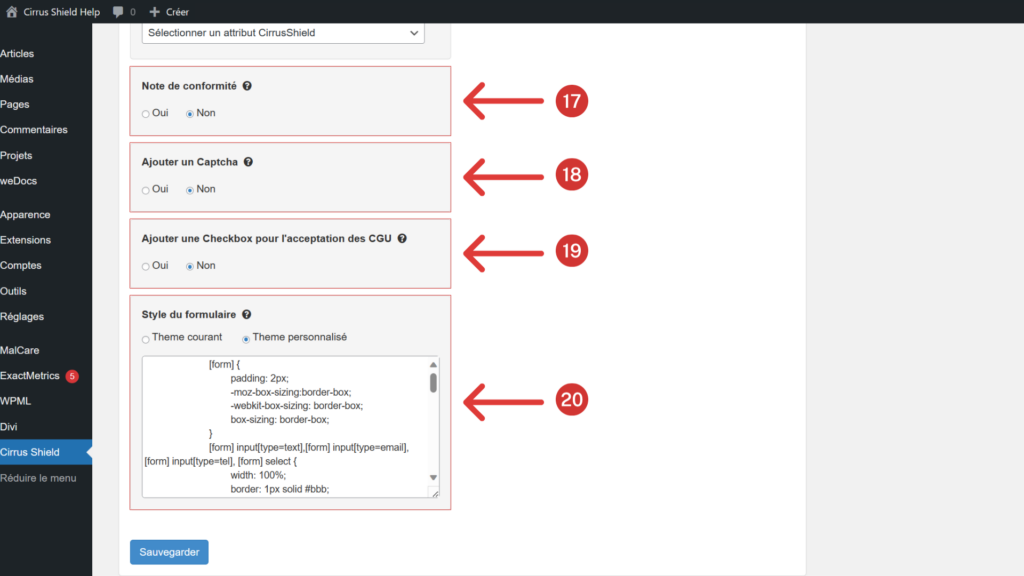
Plus bas, vous trouverez également d’autres options pour personnaliser votre formulaire :
- Ajout d’une note de conformité (17);
- Ajout d’un Captcha (18) ;
- Ajout d’un lien vers les « Termes et les conditions » (19) ;
- Personnalisation du thème avec du code CSS (20).
Cliquez sur « Sauvegarder » pour sauvegarder les modifications réalisées.
4- Personnalisation du processus d’inscription
Une fois votre formulaire créé, vous pourrez paramétrer les différentes étapes du processus d’inscription (21) :
- La notification par mail lors de la soumission du formulaire ;
- L’envoi d’un email de confirmation aux inscrits ;
- L’activation du Double Opt-in qui envoie une demande de confirmation par email à l’adresse renseignée dans le formulaire ;
- La redirection des inscrits vers une page de confirmation après inscription ;

Cliquez sur « Sauvegarder » pour sauvegarder les modifications réalisées.
Personnalisation de l’email de confirmation (paramétrage avancé)
Il vous est possible de rajouter des modèles d’email de confirmation dans le plugin Cirrus Shield pour WordPress. Pour ce faire, vous devez extraire le contenu du fichier zip contenant le plugin (téléchargeable depuis cette page). Les modèles d’emails se trouvent dans le sous-répertoire “inctemplatesconfirm”. Il vous suffit de rajouter votre modèle d’email dans ce dossier, vous pouvez prendre exemple sur le modèle d’email par défaut pour réaliser votre modèle.
Une fois les fichiers de votre modèle d’email ajoutés dans ce répertoire, il faut recréer le fichier .zip contenant l’ensemble des fichiers du plugin et téléverser ce plugin dans wordpress. Si WordPress vous demande si vous souhaitez écraser l’ancienne version, il faut accepter et installer la nouvelle version que vous avez construite.
5- Personnalisation des messages d’inscription
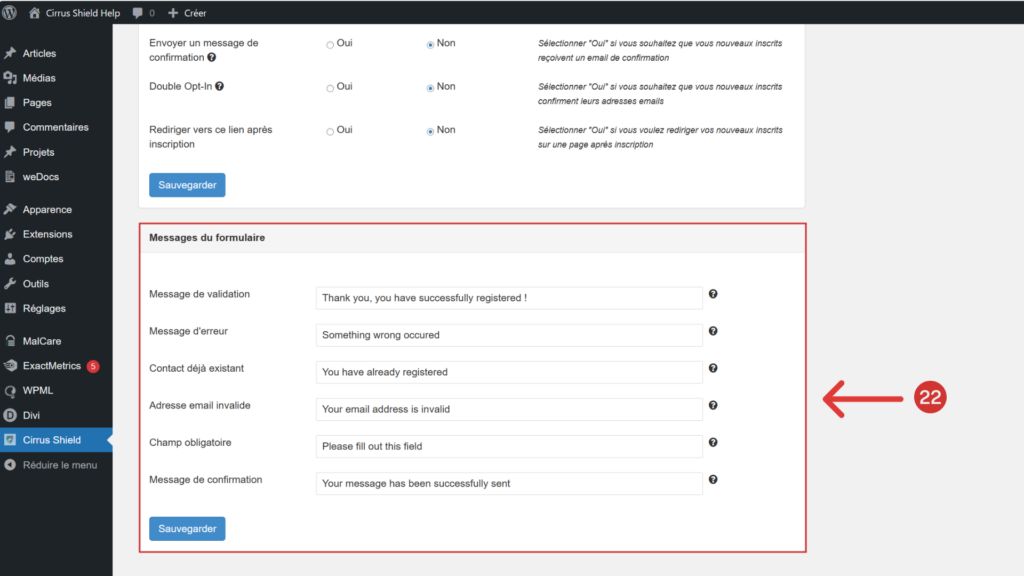
Vous pouvez personnaliser les messages d’inscription de votre formulaire (22):
- Message de validation suite à l’envoi d’un formulaire ;
- Message d’erreur ;
- Message lorsqu’une personne tente de soumettre un formulaire une seconde fois. Ceci se vérifie si l’email du soumissionnaire existe déjà dans le CRM.
- Message lorsque le format de l’email est invalide.
- Message lorsqu’un champ obligatoire n’est pas renseigné.
- Message présent dans l’email de confirmation envoyé en retour au soumissionnaire.
Cliquez sur “Sauvegardez” pour sauvegarder les modifications réalisées.
6- Ajout du formulaire à votre page WordPress
Une fois le formulaire créé et sauvegardé, pour l’intégrer à une page de votre site WordPress :
- Cliquez sur le bouton « Retour à la liste de formulaires » (23).
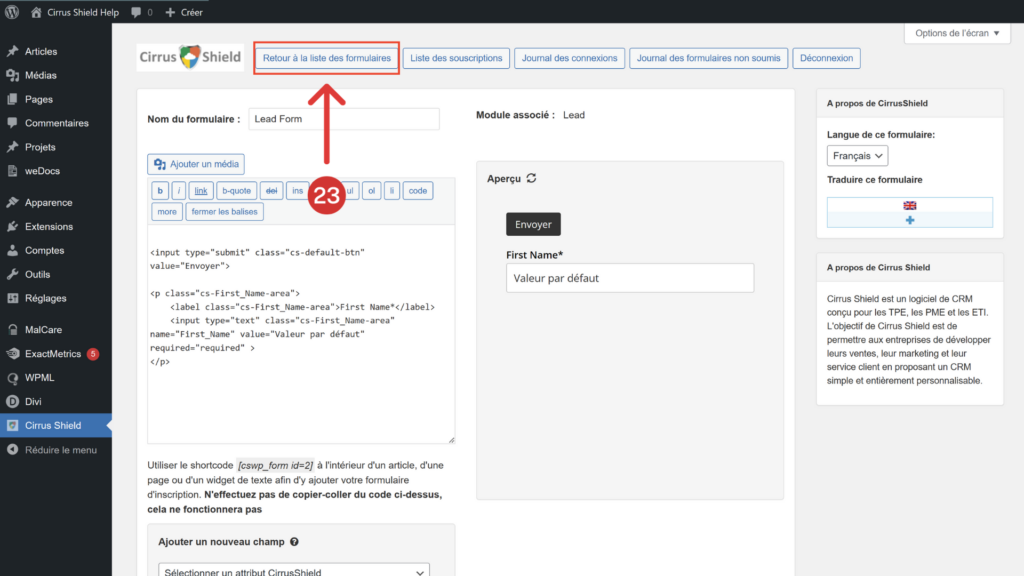
- Copiez le « Shortcode » (24) présent à droite de votre formulaire ;
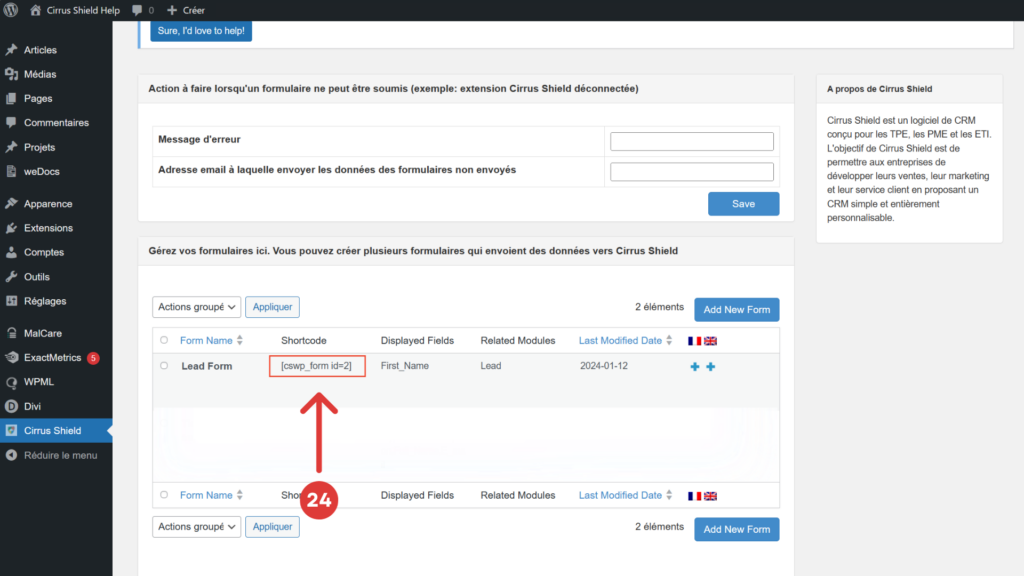
- Collez ce « Shortcode » dans votre page WordPress dans un bloc de type « Widget Code Court » (25).
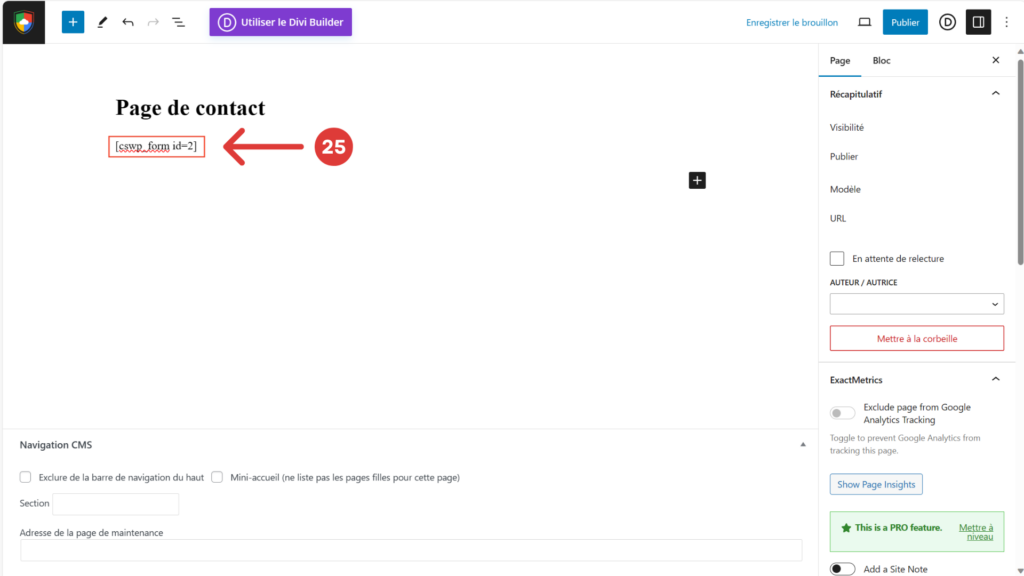
- Sauvegardez votre modification. Le formulaire créé apparaitra dans cette section.
7- Historisation des soumissions et des erreurs
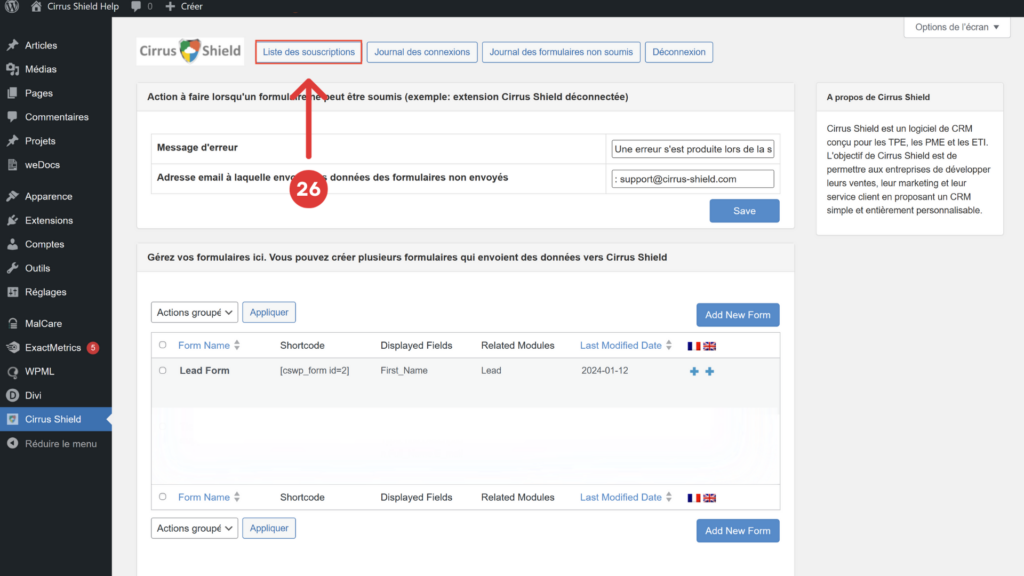
L’extension Cirrus Shield pour WordPress historise l’ensemble des soumissions de formulaires, les actions de connexion à l’API ainsi que les formulaires non soumis. Cette historisation peut vous être utile par exemple en cas de problème avec l’extension.
Pour accéder à l’historique des soumissions de formulaires, cliquez sur le bouton « Liste des souscriptions » (26).
Le tableau affiché contient :
- Le module et le formulaire correspondant qui a été soumis.
- Les informations soumises au travers du formulaire ainsi que la date et heure de soumission.
- Les données envoyées par le formulaire à l’API de Cirrus Shield
- Et celles reçues en retour de l’API Cirrus Shield.
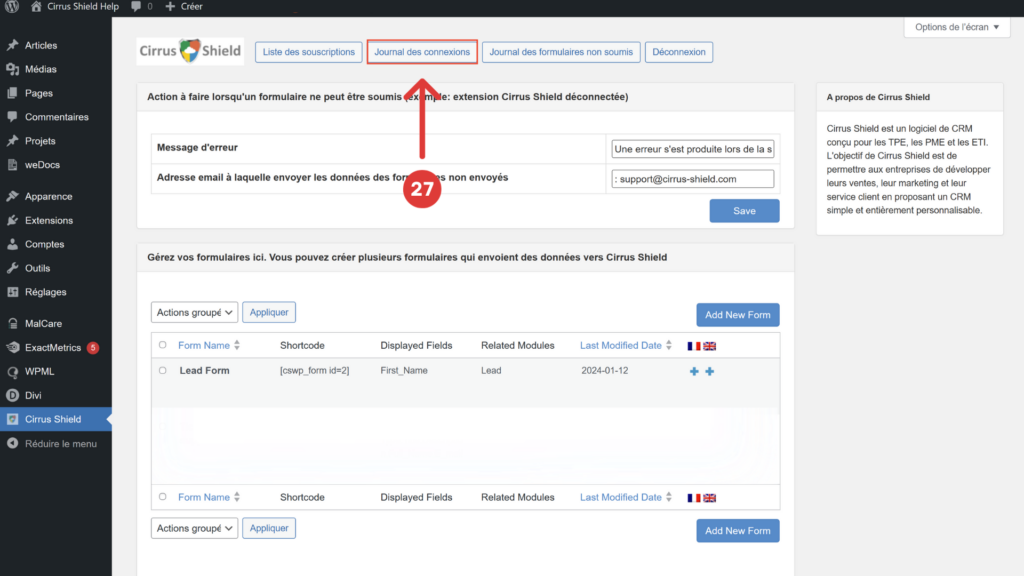
Pour accéder à l’historique des connexions à l’API, cliquez sur le bouton « Journal des connexions » (27). La page affichera l’historique de toutes les connexions effectuées avec l’API de Cirrus Shield.
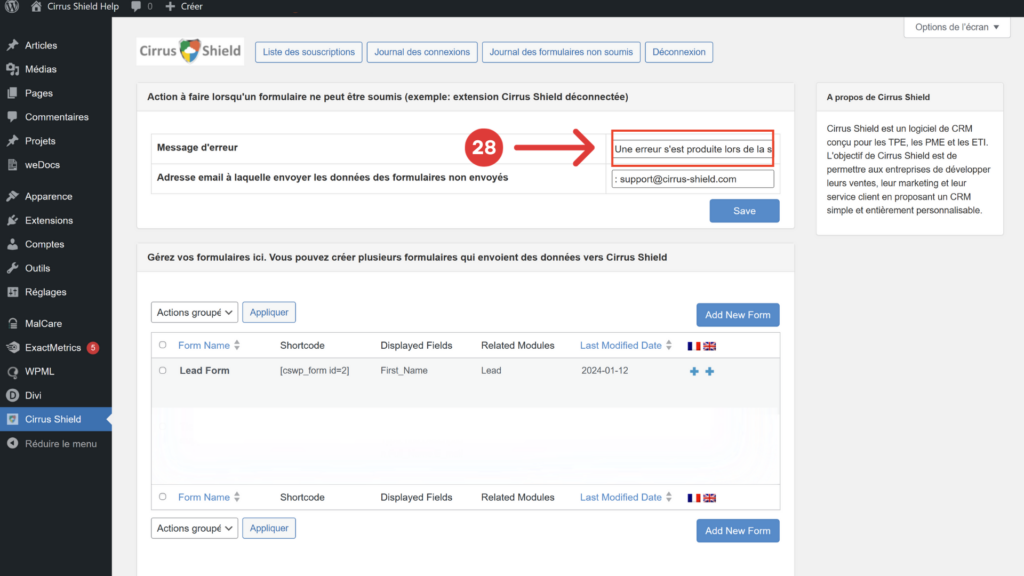
Il peut parfois arriver que la soumission d’un formulaire ne puisse parvenir à Cirrus Shield, dans ce cas vous disposez des éléments suivants :
- Vous pouvez paramétrer le message qui sera affiché dans cette situation dans le champ « Message d’erreur » (28)
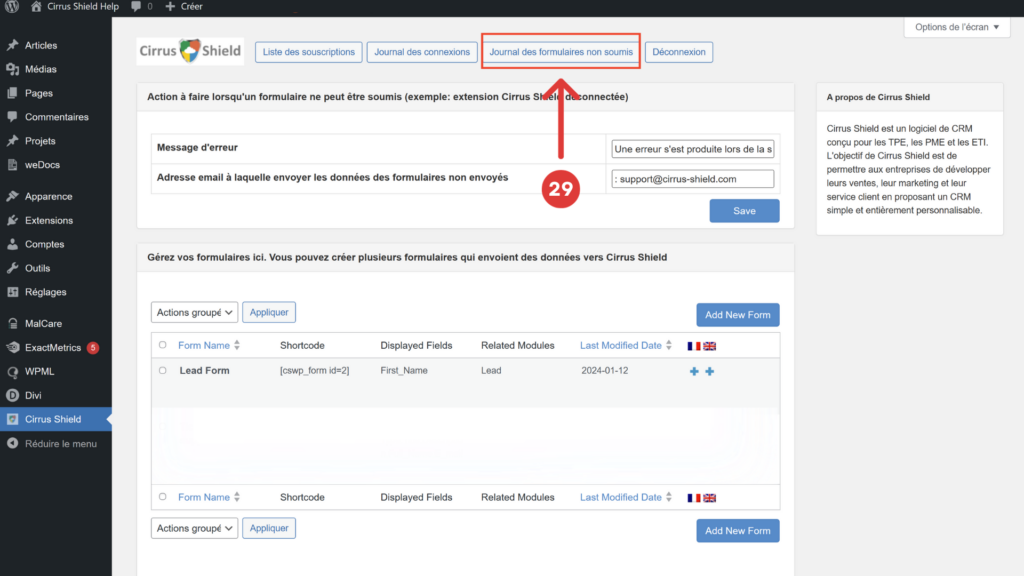
- L’extension enverra tout de même les données du formulaire à l’adresse spécifiée dans le champ « Adresse email à laquelle envoyer les données des formulaires non envoyés »
- Vous pouvez accéder à l’historique des données envoyées par le formulaire mais qui n’ont pas pu arriver dans Cirrus Shield pour une raison ou pour une autre. Pour cela, cliquez sur le bouton « Journal des formulaires non soumis » (29).
Enfin le bouton déconnexion vous permet de déconnecter l’extension avec Cirrus Shield (30).
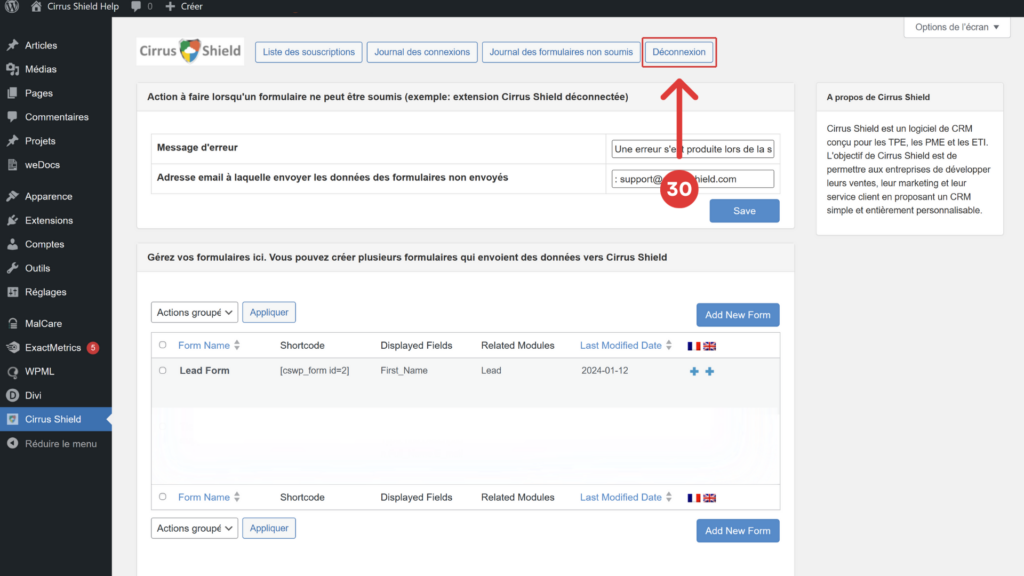
Lorsque votre extension est déconnectée les formulaires existants sont toujours disponibles sur votre site mais n’enverront plus les données vers Cirrus Shield. Vous continuez cependant à recevoir les données de ces formulaires par email à l’adresse configurée dans le champ « Adresse email à laquelle envoyer les données des formulaires non envoyés