With its WordPress plugin, Cirrus Shield allows you to put online forms integrated into your website that automatically create records in your CRM and notify you by email with each new submission
The implementation of an online form goes through 7 steps:
1- Installing the Cirrus Shield plugin in WordPress
Start by downloading the Cirrus Shield plugin by clicking on the following button:
Download the Cirrus Shield plugin for WordPress
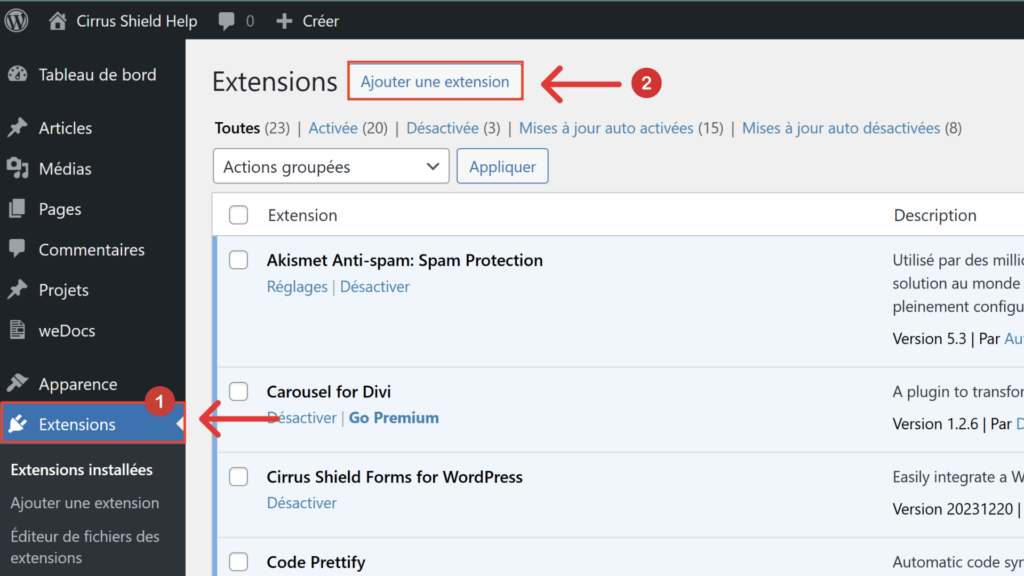
Then, log in to your WordPress site and click on the “Extensions” tab (1), “Add” (2), and then “Upload Extension” (3).
Upload the .zip file.
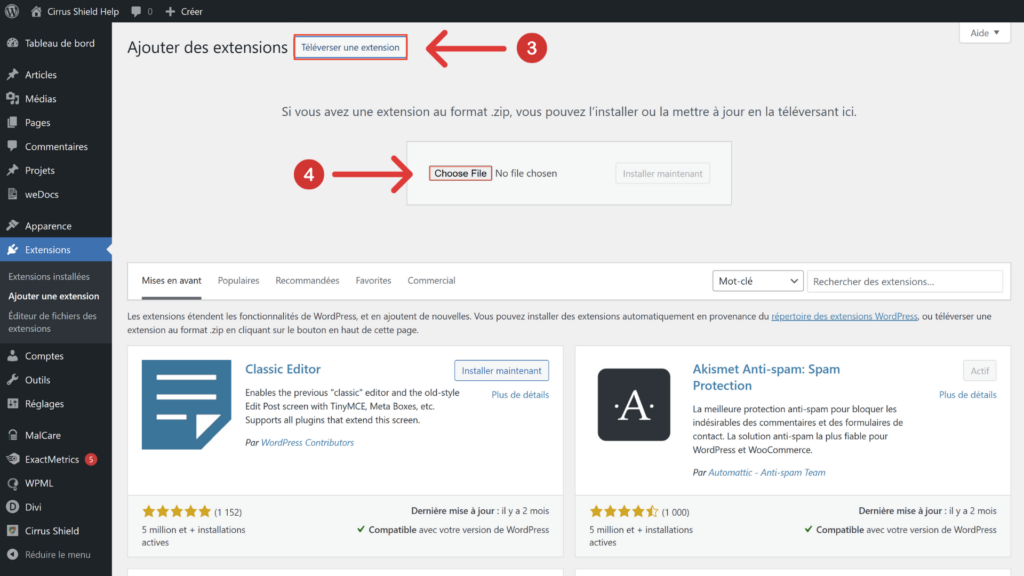
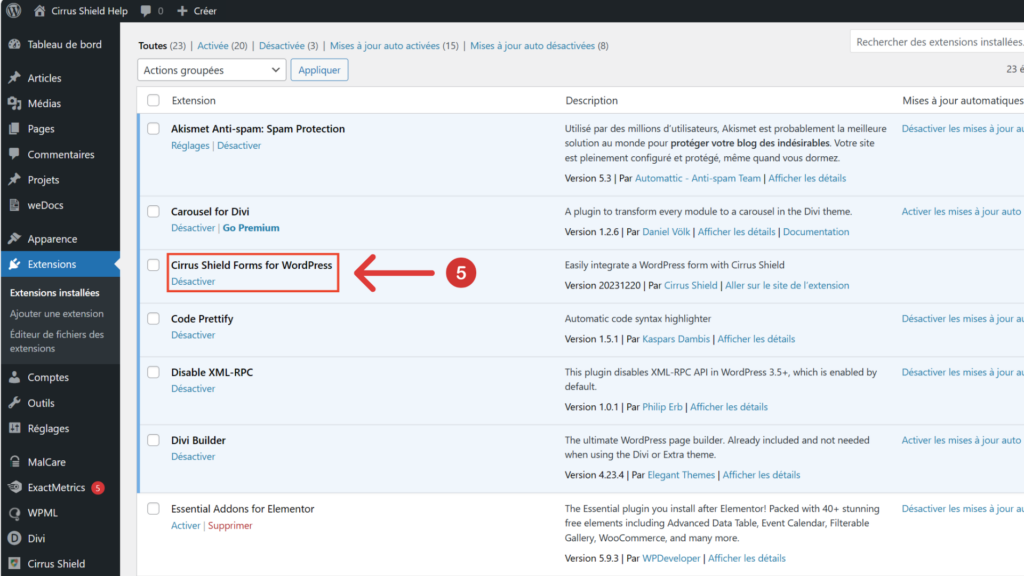
Install it (4) and activate it (5).
2- Connect to your Cirrus Shield environment.
Once the extension is installed, a “Cirrus Shield” tab (6) appears in WordPress.
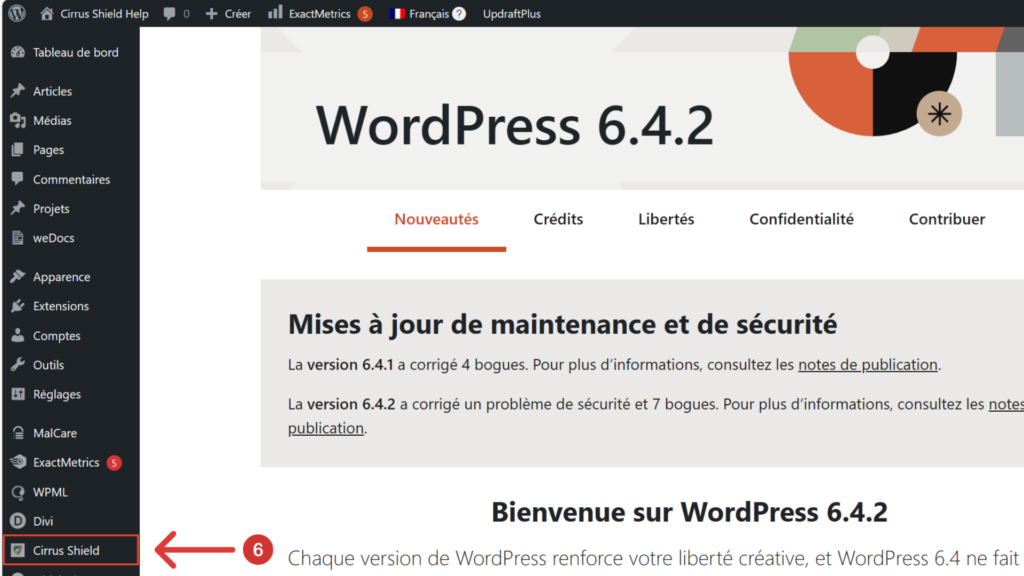
Click on it and log in by entering your CRM username and password.
Connecting to your CRM environment allows you to create forms tailored to your data model. Indeed, the forms will include the objects and fields present in your Cirrus Shield environment.
3- Form Creation
Let’s take, for example, the creation of a form that will allow your prospects to request a demonstration of your solution.
To create a form, click on the “Add New Form” button (7).
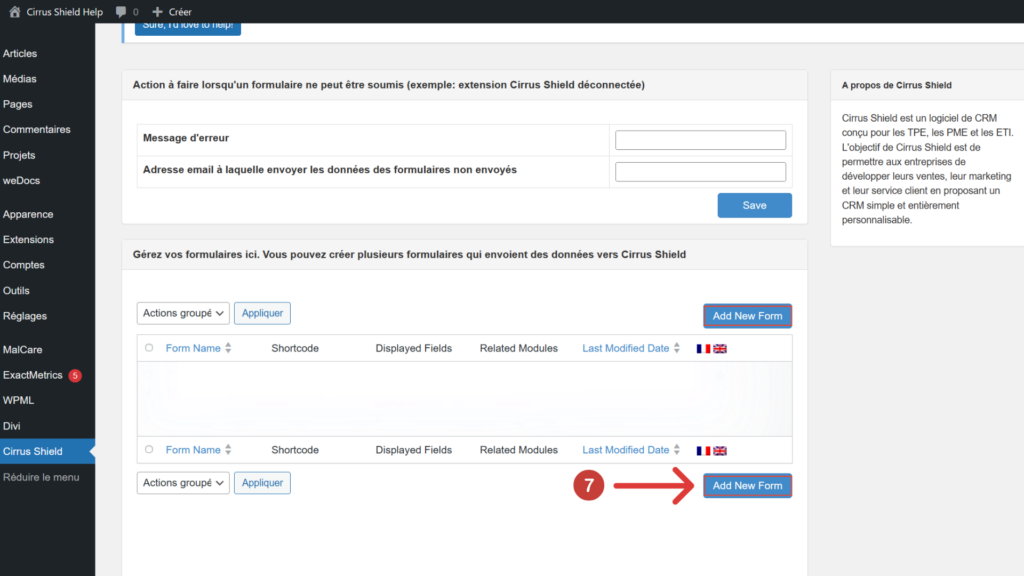
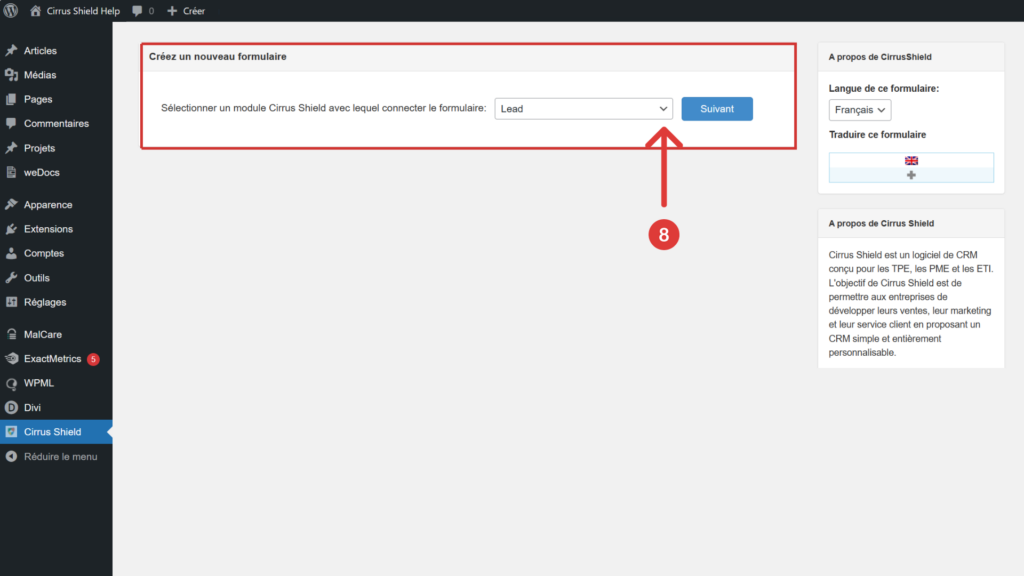
Select the Cirrus Shield object that will receive the data from your form. In our case, the “Prospect” object (8).
The form creation interface includes the following elements:
An HTML editor that allows you to directly modify the code (9).
An “Add New Field” menu to add new fields to your form (10).
A form preview to preview your modifications (11).
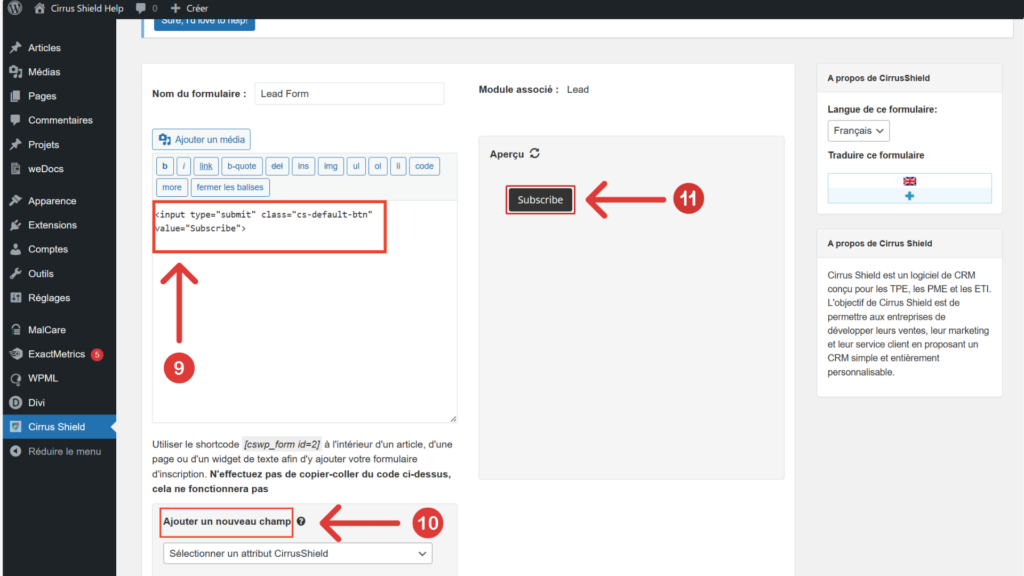
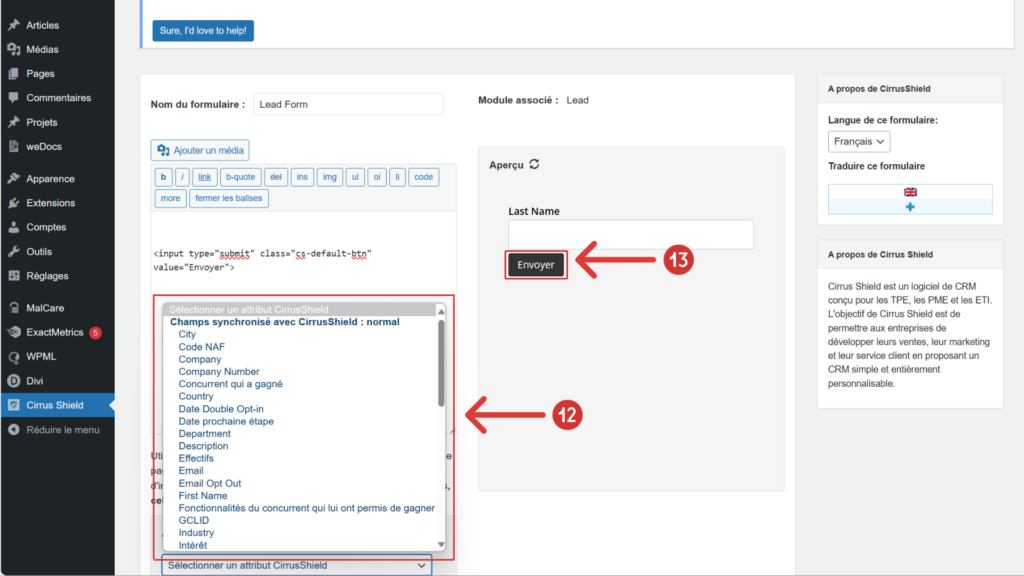
To add a new field, simply select it from the “Add New Field” dropdown menu and click “Add to Form.” The field will be automatically added to your form (HTML editor).
Note that this dropdown menu does not contain calculated fields from Cirrus Shield (such as formulas, cumulative fields, and automatic number fields) as well as those that refer to another object (search relationship and multi-search relationship) (12).
The field labels present in the form are customizable. For example, you can rename the “Submit” button to “Envoyer” (13).
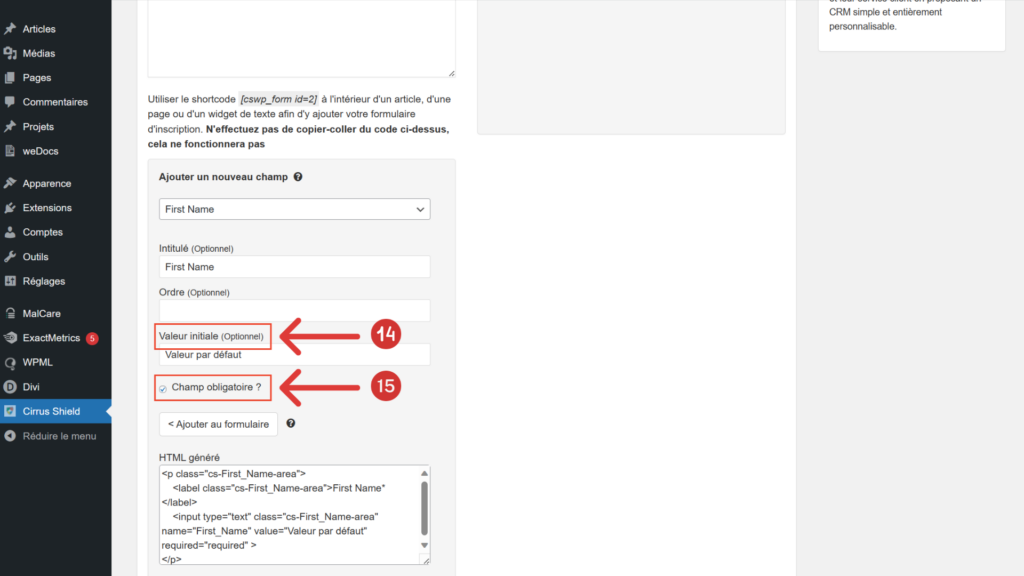
You can make the field mandatory or insert a default value into the field (14 and 15).
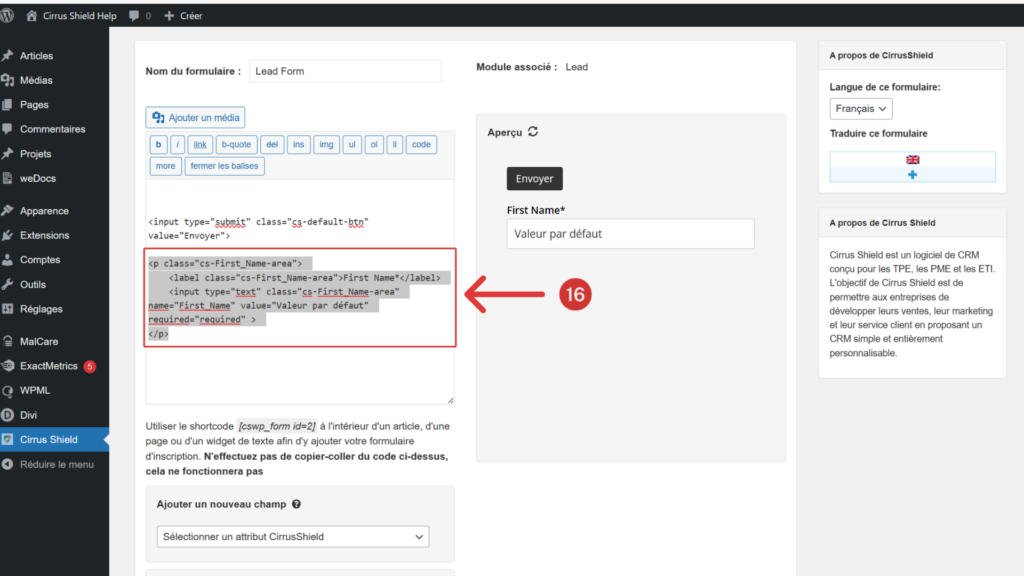
To change the order of the fields, select the field from the opening <p> to the closing </p>, and cut and paste it to the desired location (16).
Note on checkbox elements
You must ensure that you have a value [value=”1″] in the HTML code of a checkbox (input type=”checkbox”). Indeed, the value attribute is common to all input fields; however, this is used specially for input fields of type checkbox: when a form is submitted, only the checkboxes that are checked are sent to the server and the value sent is that of the value attribute. If the value attribute is not specified, the value “on” is sent by default, and this value is not accepted by Cirrus Shield, which expects value=1 for a checked box.
Further down, you will also find other options to customize your form:
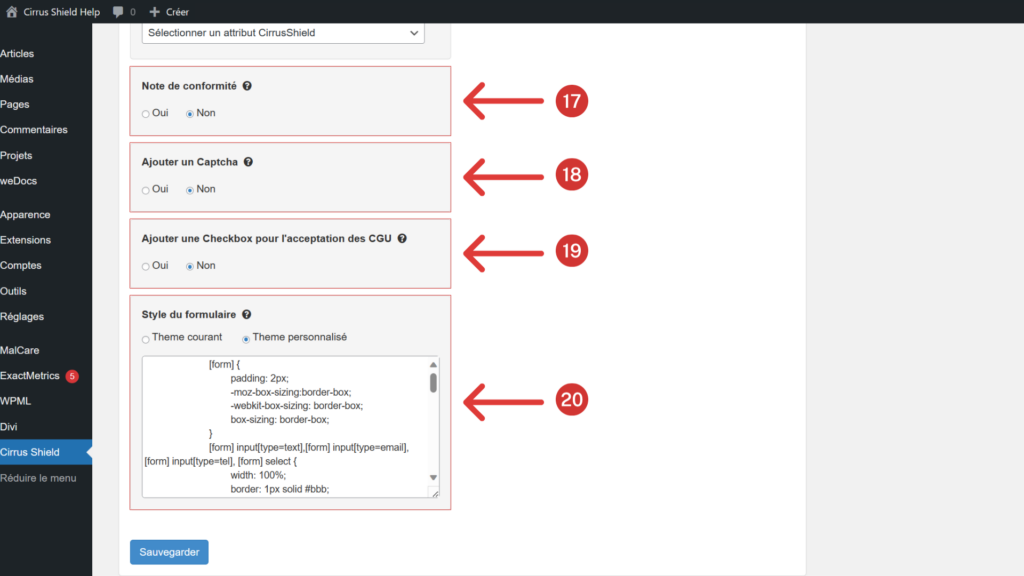
Adding a compliance note (17);
Adding a Captcha (18);
Adding a link to the “Terms and Conditions” (19);
Customizing the theme with CSS code (20).
Click on “Save” to save the changes made.
4- Customization of the registration process
Once your form is created, you can configure the various steps of the registration process (21):
Email notification upon form submission;
Sending a confirmation email to registrants;
Enabling Double Opt-in, which sends a confirmation request email to the address provided in the form;
Redirecting registrants to a confirmation page after registration;

Click on “Save” to save the changes made.
Customization of the confirmation email (advanced settings)
The email templates are located in the subdirectory “inctemplatesconfirm”. Simply add your email template to this folder, you can use the default email template as an example to create your own.
Once the files of your email template are added to this directory, you need to recreate the .zip file containing all the plugin files and upload this plugin into WordPress. If WordPress asks you if you want to overwrite the old version, you should accept and install the new version you have built.
5- Customization of registration messages
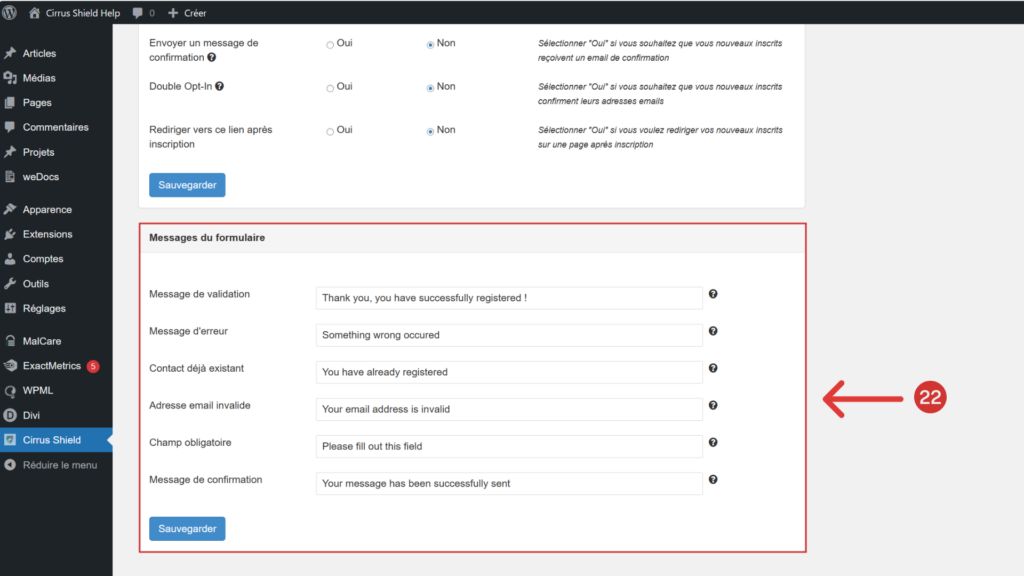
You can customize the registration messages of your form (22):
Validation message after submitting a form;
Error message;
Message when someone tries to submit a form a second time. This is checked if the submitter’s email already exists in the CRM.
Message when the email format is invalid.
Message when a mandatory field is not filled in.
Message present in the confirmation email sent back to the submitter.
Click on “Save” to save the changes made.
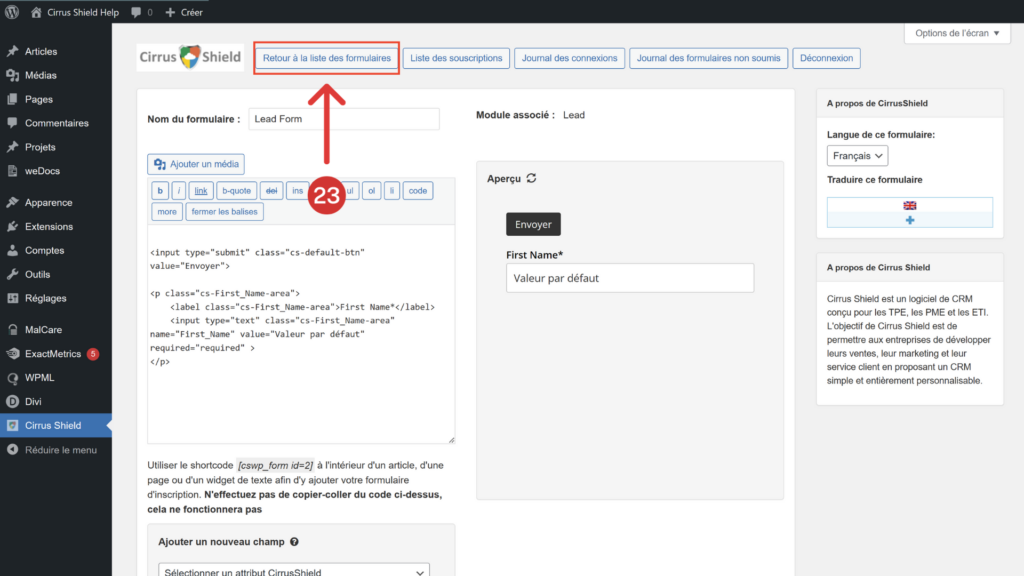
6- Adding the form to your WordPress page
Once the form is created and saved, to integrate it into a page on your WordPress site:
Click on the “Back to form list” button (23).
- Copy the “Shortcode” (24) located on the right side of your form.
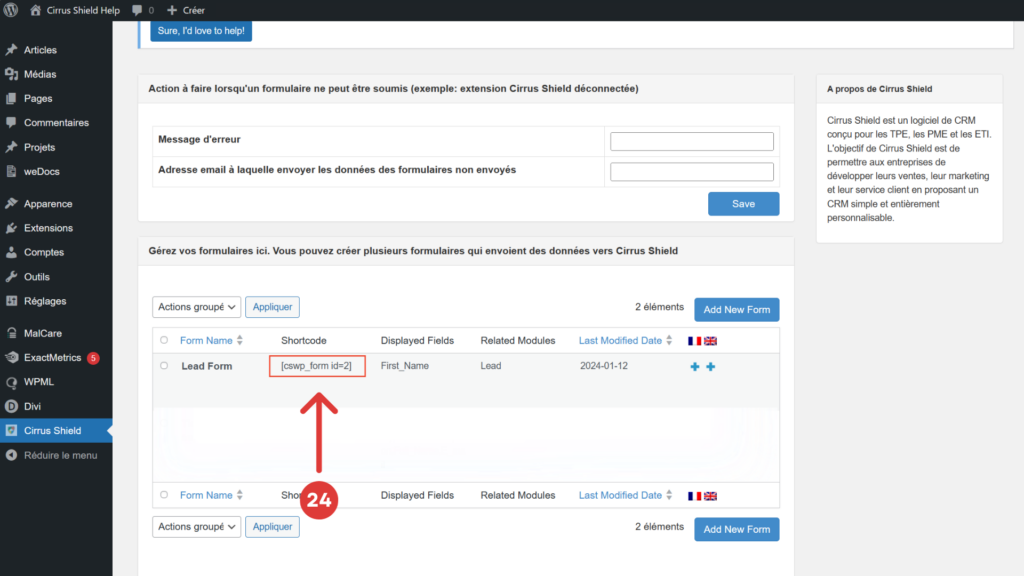
- Paste this “Shortcode” into your WordPress page within a block of type “Shortcode Widget” (25).
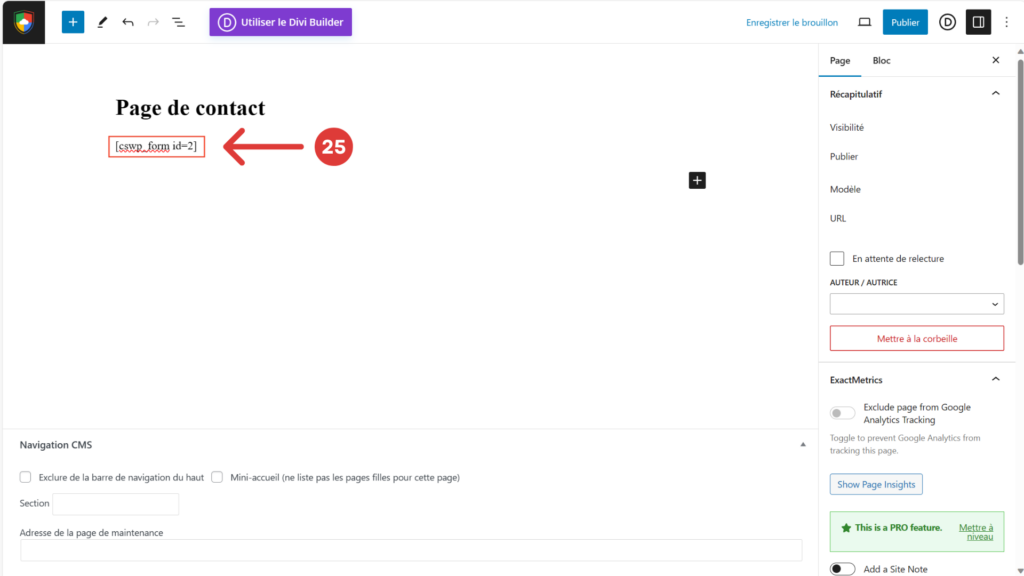
- Save your modification. The created form will appear in this section.
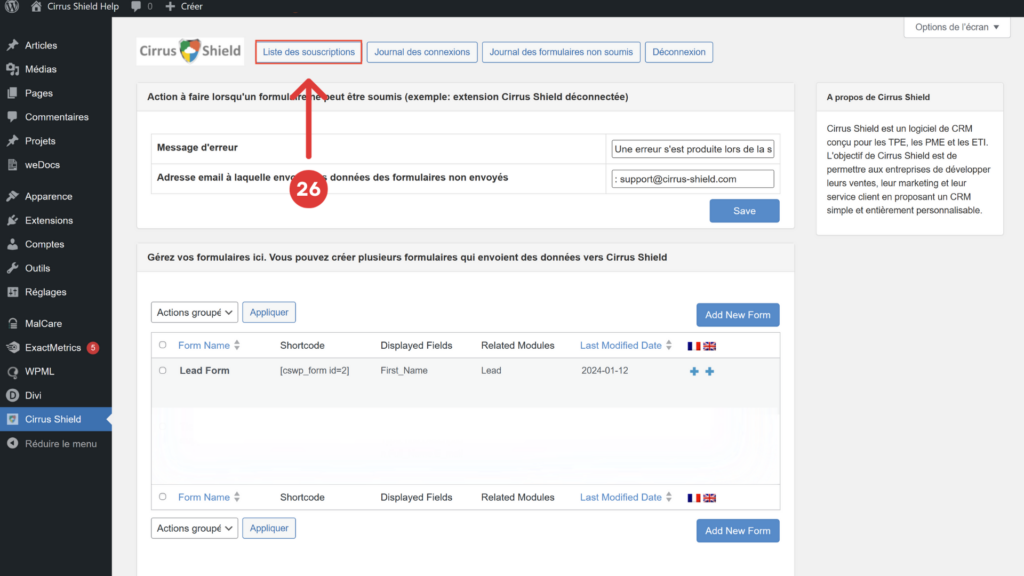
7- Submission and Error Logging
The Cirrus Shield extension for WordPress logs all form submissions, API connection actions, as well as non-submitted forms. This logging can be useful to you, for example, in case of an issue with the extension.
To access the form submission history, click on the “Subscription List” button (26).
The displayed table contains:
The module and corresponding form that was submitted.
The information submitted through the form along with the date and time of submission.
The data sent by the form to the Cirrus Shield API.
And the data received in return from the Cirrus Shield API.
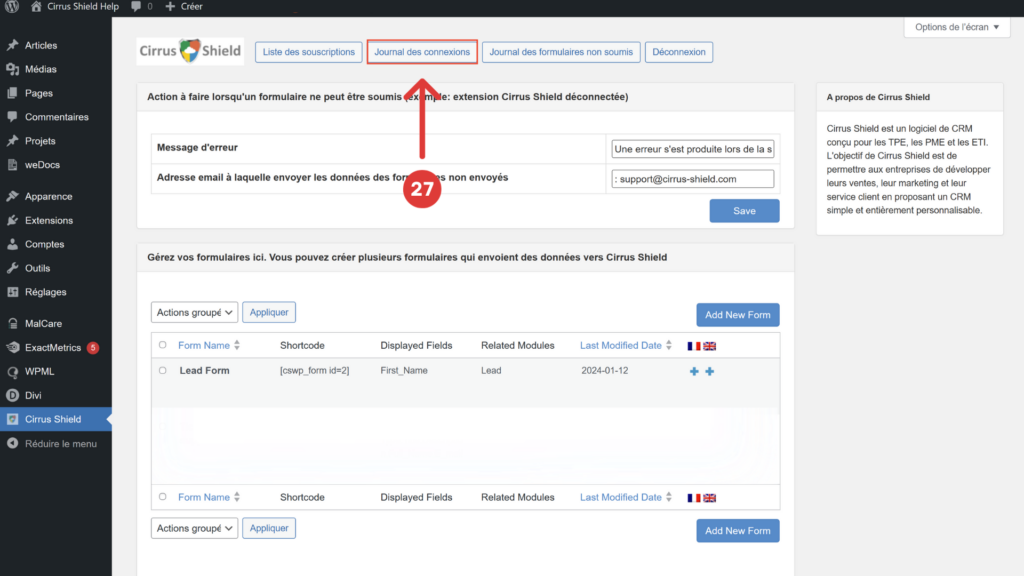
To access the API connection history, click on the “Connection Log” button (27). The page will display the history of all connections made with the Cirrus Shield API.
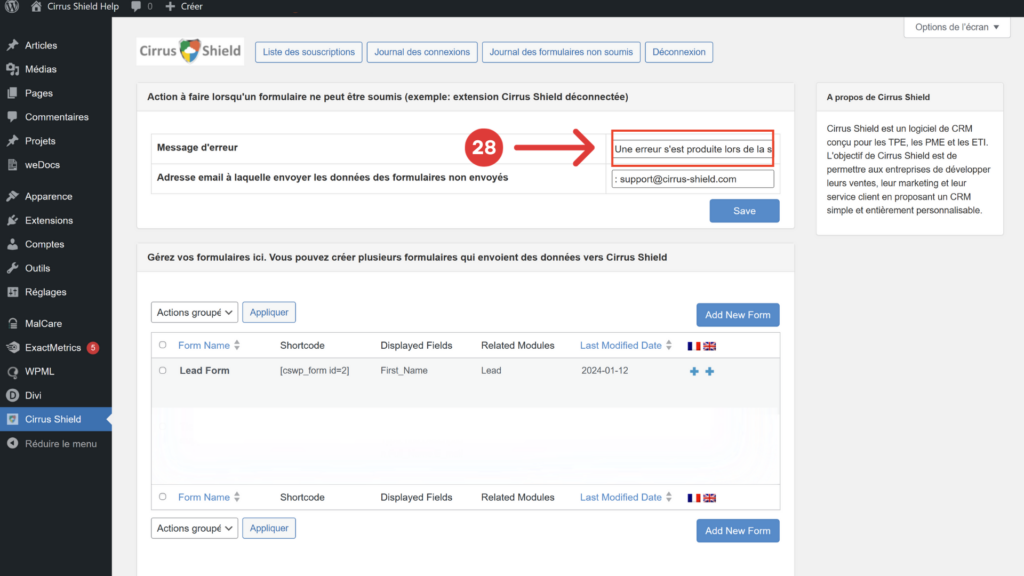
It may sometimes happen that the submission of a form cannot reach Cirrus Shield. In this case, you have the following elements:
You can configure the message that will be displayed in this situation in the “Error Message” field (28).
The extension will still send the form data to the email address specified in the “Email Address to Send Data from Unsended Forms” field.
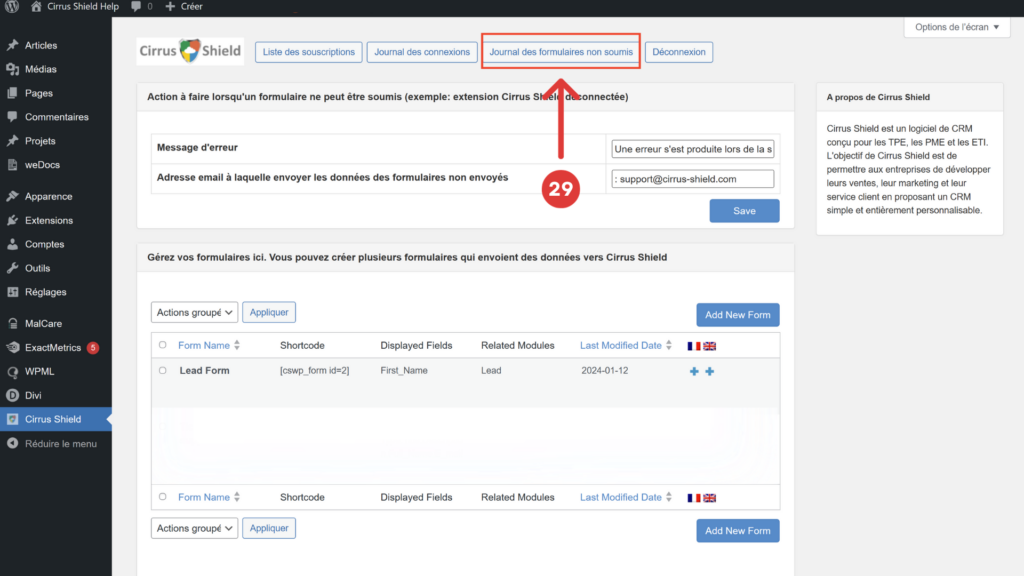
- You can access the history of data sent by the form but which could not reach Cirrus Shield for one reason or another. To do this, click on the “Unsubmitted Forms Log” button (29).
Finally, the logout button allows you to disconnect the extension from Cirrus Shield (30).
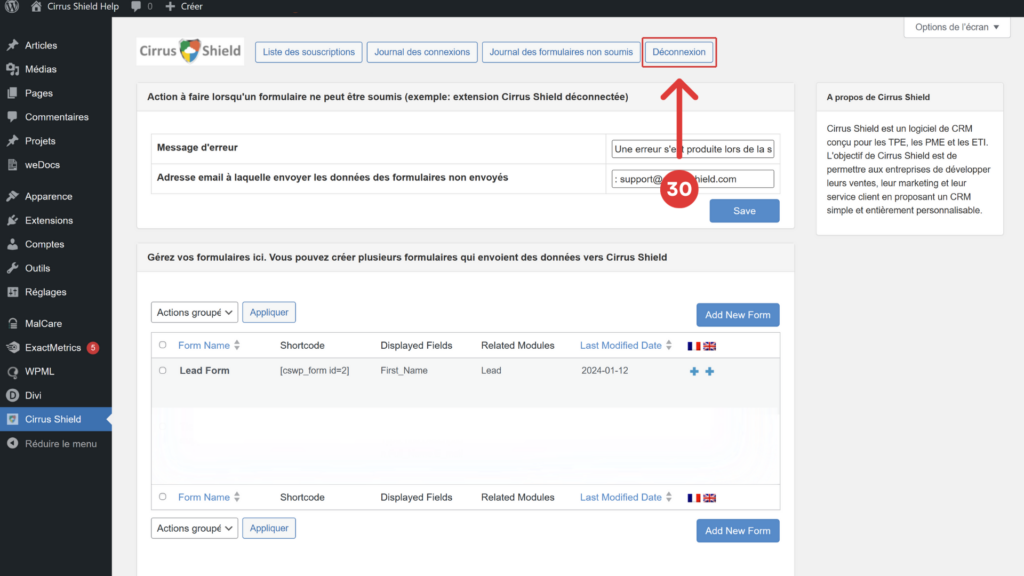
When your extension is disconnected, existing forms are still available on your site but will no longer send data to Cirrus Shield. However, you will continue to receive data from these forms via email at the address configured in the “Email Address to Send Data from Unsended Forms” field.